A couple of life hacks on how to open nail polish if it’s dried out and won’t open... at all. The problem in most cases is trivial and can be solved in a couple of minutes.
In most cases, it is not possible to open the bottle not because it is tightly or tightly closed, but because of the remnants of varnish that have dried under the lid. And here there are two solutions - heat or dissolve.
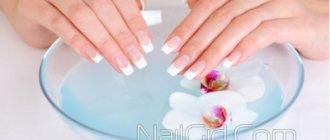
Usually, it’s enough to simply place a bottle of varnish under running hot water for about fifteen seconds, or even immerse the bottle in a bowl of water for a couple of minutes.
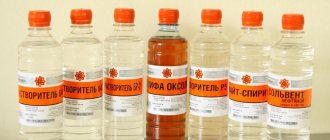
Another effective method is to use nail polish remover (acetone). Just turn the bottle upside down, moisten a cotton swab with remover, and blot it under the cap. The acetone that has penetrated under the cap will dissolve the dried varnish, and the bottle will “creak”, but open.
After each manicure, before closing the bottle, carefully wipe the threads and neck of the bottle from any remaining varnish - this way you will avoid hassle in the future.
Before unscrewing the lid, for a more comfortable and secure grip, wrap it with an elastic band several turns. In general, for this you can use any rubber fabric such as gloves or Chinese bottle openers, or an ordinary towel.
The methods described above have been repeatedly tested in practice and are effective when used both in combination and separately. I hope the article was useful to you, have a beautiful manicure and see you in the next publications!
It's time to update your manicure, but the plug won't come off? Don't worry about this. We offer many life hacks on how to open nail polish if it won't open.
The cap has dried on tightly, or it is an unused bottle, do not rush to throw away the bottle, because one of the above methods will definitely give a positive result.
Opening a new varnish
If the bottle has not been opened before, and attempts to unscrew the cap ended in failure, it is recommended to take the following steps:
- Make sure that all protective and decorative covers have been removed from the bottle. Hold the cap with two fingers and pull upward with force.
- If the top is difficult to grip and your fingers slip off the surface, you need to tighten your grip. Wrap the lid in a towel or wear rubber gloves. Turn the cap firmly counterclockwise and try to unscrew it.
How to deal with a dried-on lid
Due to the contact of varnish or gel on the neck, the cap is firmly glued to the bottle. There are several ways to solve this problem.
Soaking in water
If the options for opening the bottle do not produce results, soaking the nail polish in a high-temperature liquid will help open the nail polish:
- Pour hot water into a shallow container.
- Place the bottle cap down in the water.
- Leave for 5 minutes and remove the bottle from the water. Now the bottle will quickly unscrew.
Only the plastic part is placed in water, because upon contact with heat, the structure of the product changes, becomes sticky, and delaminates.
Hot water
Dried particles of a cosmetic product under the lid soften using a simple method:
- Place the top of the bottle under running hot water (the higher the temperature, the better).
- The bubble should be rotated slowly.
- The procedure takes from 30 seconds to 2 minutes depending on the water temperature.
- Dry the lid from moisture so that it does not slip.
- Under the influence of water, the material of the cap expands, the dried particles soften, try to unscrew the jar.
Important! Part of the bottle with dye must be protected from the stream so as not to spoil the contents.
Available means
Increasing the grip force will help unscrew the bubble. To increase retention, an ordinary elastic band is used.
If you don’t have it on hand, use tape or a fabric bandage. Take adhesive materials with a minimum width of 1 cm.
A rubber band is placed on the cap of the bottle. It will take more than 3 coats to eliminate slippage. This will help grip the cap and make it easier to turn.
Advantages and disadvantages of gel polish
Any nail coating has its advantages. Shellac is no exception. It's good because:
- dries quickly under an ultraviolet lamp. Conventional varnishes dry under normal conditions. Drying time depends on the thickness of the coating;
- Suitable even for short nails;
- has a certain strength and durability. If your nails grow quickly, they may outgrow the coating before it chips. With minimal contact with hot water, the coating lasts up to 3 weeks;
- the cost of applying shellac coating is affordable for any beauty;
- Helps strengthen nail plates. When extensions are applied, artificial nails take a long time to wear, the plates underneath do not breathe and become thin and brittle. Gel polish is applied for two weeks, it significantly strengthens the nails and promotes their rapid growth.
The disadvantages of gel varnish coating are the following circumstances:
- This type of manicure is salon in nature. For home use, you should purchase an expensive ultraviolet lamp and special products for removing gel polish without damaging your nails;
- The procedure can be done if your nails are healthy. Otherwise, you should first treat and restore your nails with vitamins and special preparations, and then apply a manicure. The advice of a professional master will help here;
- You can’t wear gel polish all the time. This is the peculiarity of shellac manicure. After 5 - 6 sessions, the nails should rest so that the recovery process takes place and an allergic reaction to the composition of the varnish does not occur.
Why the coating doesn't stick (video):
What to do if shellac doesn’t stick (video):
Lose weight without denying yourself your favorite foods! Eat and lose weight! Find out how! >>
25 reasons for gel polish peeling (video):
Beautiful, strong nails are the key to health. A designer manicure based on gel polish will help decorate them. Proper application and careful handling will help the coating last a long time without chipping, cracking or delamination.
Liked? Share with your friends!
Using nail polish remover
If the bottle does not open again, an effective method is to soak it in a special liquid to remove the cosmetic substance. Due to the solvent, the dried elements dissolve, and the jar can be opened without effort.
Follow the plan:
- Take a cotton swab and soak it in the solution.
- Turn the bottle over and apply the product into the slot, pressing down to ensure maximum penetration.
- After a few minutes, turn the cap.
- The procedure should be repeated for further soaking and deeper penetration of the product under the lid.
If you cannot unscrew the cap the first time, it means that the dried nail polish has not dissolved enough. Take a pipette, fill it with solvent and inject a few drops into the gap.
The second reason is you
- Some girls have one interesting natural feature - wet nail plates. Alas, gel polish is powerless against such a turn. Its composition is designed in such a way that it adheres better to completely dry nails. But regular polish wins in this regard and promises to serve faithfully even on wet nails.
A wet nail plate is one of the reasons for gel polish peeling.
Interesting! Sometimes a high-quality primer helps against this problem. If you apply this product in 2 layers, your nails will dry thoroughly.
- Perhaps you didn’t even realize that the root of this problem could be in your critical days. Yes, yes, the body can also be irritated by everything during this period, and it may well not accept everything new.
- Analyze whether you handle the finished manicure with enough care? Even though gel polish is highly durable, it will clearly not be ready for housework without gloves and mechanical stress. You should take special care of your hands in the first 12 hours after applying gel polish - that’s how long it will take for it to harden.
- The condition of the nails is also important as a result of the manicure. Porous, weakened or brittle plates simply cannot cope with the load of gel polish. If you suspect that this is the reason, start restoring your nails.
Manicure option for thin nail plate
Note! If the condition of your nails is not too bad, it makes sense to strengthen them with acrylic powder. This will make the plates thicker, and at the same time ensure durability of the manicure.
- But against obvious unevenness on the nails, careful sanding before applying the gel coating often helps.
Nail polishing
What can I do to make the lid easy to open in the future?
To quickly open the jar at any time, you should follow simple recommendations for using and storing manicure products:
- Always seal the tube tightly after use. When applying gel polish, do not leave the bottle open for a long time.
- Dyes should be stored in a standing position - this will limit the penetration of liquid under the cap.
- When painting your nails, do not leave excess product on the neck.
- You can prevent drying by thoroughly wiping the threads on the bottle; to do this, use nail polish remover. Soak a piece of cloth in solvent, treat the outside of the bottle, and dry with a dry towel. Repeat the procedure until completely cleansed. Tighten the bottle only after the surface has completely dried.
- Store in a cool and dry place away from direct sunlight. Heat and light help thicken the contents.
Gel polish does not last - reasons for technology and materials
First, let's look at the reasons from the first group.
1. Poor cuticle treatment. If you do not properly remove the pterygium (the fringe-like skin on the nail near the cuticle), it will create detachments in this part of the nail. In 90% of cases of gel polish detachments at the cuticle, this is precisely the cause.
2. When covering your nails with gel polish, do not skip the preparatory stage of removing the gloss with a file. To do this, use a buff or file 180-240 grid. By sanding the nail, we lift small scales on the surface of the nail, thereby helping to strengthen the adhesion to the material.
3. If after polishing the nail you do not remove or poorly wipe off the dust from the nail, then it will not allow you to create a coating that lasts long. Please note that dust can hide under the cuticle or near the side rollers, and these are the most vulnerable places for detachments. To remove dust, it is better to use a brush rather than a brush, and certainly not just blow it off the nail.
4. Another step that can be forgotten, which ultimately leads to gel polish peeling. This is degreasing the nail plate. Problems may arise if you or your client have problematic nails that are prone to oiliness and brittleness. If your nails are dry and hard, then you can immediately rule out the cause of poor degreasing.
5. If you touch your nails with your finger after degreasing, then particles of fatty tissue will appear on them again, hence another reason for detachment. This cannot be done. And if you touch it by accident, the nail will have to be degreased again.
6. A primer can provide additional adhesion to the nail plate, but its incorrect application will cause detachments. First, thoroughly wipe the primer brush on the neck of the bottle so that nothing drips from it, and apply a thin layer to the nail. Be sure to give it time to dry - 10 seconds is enough.
7. Detachments of gel polish can form in places where the material flows under the cuticle or on the lateral sinuses of the nail. This is especially easy to miss with base and top, since they are transparent. Therefore, streaks must be removed before polymerization in the lamp.
8. It is often written that detachments at the tips of the nail are caused by the fact that the end of the nail is not sealed. However, experienced craftsmen have proven that sealing is not necessary: this does not affect the durability of the gel polish. In fact, on the contrary, the reason for detachments at the tip when sealing may be that the gel polish flows under the nail (free edge). And since no one there prepared it for coating, during wear it begins to peel off.
9. Another cause of detachments can be the application of gel polish in a thick layer. Other problems arise from this: uneven distribution and bleeding onto the side rollers, insufficient drying (it is difficult for light to penetrate through a thick layer and dry it evenly), burning in the lamp, shrinking and bubbling of the varnish. Therefore, each layer of gel polish, base and top is applied thinly, even if this means you have to apply one more layer.
10. Poor drying of gel polish in a lamp can be caused not only by a thick layer when applying it, but also by insufficient lamp power. Weak and old lamps are already being widely replaced by new hybrid lamps with a power of 48 W or more. For example, Sun 4s Plus.
11. Low-quality materials, gel polishes that have expired or are rarely used, which have managed to delaminate while standing (this is easy to notice by the appearance of a translucent liquid on the surface), can also wear poorly and cause detachments and chips.
12. When removing the previous coating with a milling cutter, old detached materials may be poorly removed or small pockets may remain when removed to the base. This is the old coating left behind and leads to the appearance of detachments on the nails.
13. Old and worn coating also begins to peel off over time. This occurs due to shrinkage of the material and the appearance of unevenness on its surface, as well as due to the movement of the center of gravity closer to the tip of the nail (especially noticeable on long nails).
To solve the problem of gel polish peeling off from nails, first evaluate all the above points from the point of view of your work, materials and try to change something to eliminate this factor. If none of this helps, then it may be the condition of your nails or something inside your body.
Common Mistakes
What not to do:
- Do not knock the bottle on a table or wooden surface unless it opens. If you physically impact the plastic part, you can easily break the jar and spill the contents.
- Do not overdo it. Before using tools (pliers, tongs, etc.), try other methods first.
- Do not unscrew the bottle using a screwdriver, scissors, or knife, otherwise there will be gaps and the product will deteriorate under the influence of air that penetrates.
Why is gel polish difficult to remove?
Sometimes removing gel polish at home can be problematic. Even if girls use standard methods, they cannot remove the old coating. Why does this happen? Let's try to figure it out:
- The main reason for poor removal of long-term coating is the topcoat. Most companies produce products that are difficult to dissolve in liquids containing acetone. Therefore, the top layer should be sawed off with a file.
- Often the coating is not removed only because a different brand of liquid is used. Experts recommend removing it only with products from the same series.
- If the nails were heavily filed before applying the coating, it will take a very long time to remove it. Make sure that the technician removes only the top fatty layer of the plates before using the base.
- Another factor that worsens the coating removal process is the presence of a complex design. If you used gel paints, glitter or stickers, it will be difficult to remove the gel polish layer. In this case, you will also have to cut off the decorations first, and only then soak the plates in liquid.
- Gel polish does not cut off well if it has been applied in a thick layer. Most coatings cannot be used in this manner due to the appearance of bubbles and bumps. However, a number of manufacturers allow the application of gel varnish in large quantities, as a result of which difficulties arise during removal.
Knowing why gel polish is difficult to remove, you can apply the coating so that later there will be no difficulties when removing it. We also suggest watching the video. The video will tell you how to remove Shellac:
All masters have their own secrets for both applying and removing nail coating. In the comments, we invite you to share your own experiences for removing old gel polish from nails.
13488