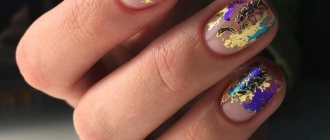
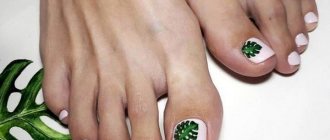
Currently, one of the most relevant and popular types of nail design is acrylic modeling. Thanks to this very non-trivial art, you can create very effective compositions. After all, hands are a woman’s calling card. And everyone wants to look attractive and irresistible. Therefore, today women are choosing more and more interesting nail designs to emphasize their individuality.
This design technique is not very simple and requires special training. Be patient, because even the most talented people fail to create masterpieces the first time. Some people prefer to enroll in special courses and learn this art, while others prefer to gain the necessary knowledge on the Internet.
Modeling with acrylic powder - design features
To master a new technique, you must keep in mind that you first need to create and think through a sketch of the future design, and only then begin to create a masterpiece. Moreover, acrylic modeling is not very easy for beginners. Experienced craftsmen always advise to first draw a pattern on paper or on tips, and only then begin to implement it on the customer’s hands. Particular attention should be paid to details; they must be done very carefully and have a clear, perfect outline.
Performance technique
To create voluminous figures on nails, acrylic powder and liquid are used. To work, you will need a special brush, with which a design is applied to the nails. The process of applying the design actually resembles sculpting; the finished elements dry within one and a half minutes and resemble elements of sculpture.
To make acrylic modeling look more sophisticated, you first need to extend your nails or grow your own and cover them with gel polish to strengthen them. In the process of creating a design, the main load falls on the free edge of the nail, so it must be strengthened so that the nail plate does not crack.
Who is it suitable for?
Acrylic sculpting can be performed exclusively on acrylic extended nails. This is due to several reasons. So, it is impossible to sculpt on a natural or gel plate for the following reasons:
- The sculpting design is heavy, it overloads the free edge of the nails, even when the sculpture is as small as in the photo. At the same time, the natural plate can crack or break both during the sculpting process itself and with minimal pressure on the free edge of the nail. From this point of view, only the simplest and smallest volumetric designs can be performed on natural nails;
- Fastening the frame for complex and strongly protruding figures is possible only on an extended plate. It is not always possible to do this even when using tips. The most preferable option for this parameter are acrylic nails made on forms;
- The surface of the nail should be as large as possible, as well as even and smooth. The slightest unevenness can cause the figure to fall off, and the acrylic itself will cause detachments. On natural nails, simply covering them with gel, such smoothness cannot be achieved.
For extensions, you should choose acrylic, since the most durable “adhesion” of such nail designs with acrylic, like modeling, will only be achieved with a similar material. In addition, this material is stronger than gel, and therefore it is not necessary to make the plate thick in order for it to withstand the weight of even a fairly large figure. The only downside is that it is almost impossible to repair acrylic, and therefore if there is a crack in the nail you will have to remove it completely, even if the sculpting element is not damaged.
Required materials and tools
To do a sculpted manicure, you will need:
- Acrylic powder of different colors.
- Liquid. It is a special self-hardening liquid. It is better to use compositions based on ethyl methacrylate. Unlike methyl methacrylate, it is not as harmful to health and does not cause allergic reactions.
- Modeling brushes. You should purchase a round brush with a sharp tip and a thin small brush, which will be convenient for drawing small elements.
- Decor (beads, bouillons, rhinestones, sparkles, etc.).
To create a flawless manicure that will delight its owner for at least two weeks, you should use only high-quality materials from trusted companies.
Acrylic sculpting on nails
Traditional manicure for special occasions is considered too restrained and not effective enough. For festive decorations, acrylic nail sculpting is better suited, allowing you to create beautiful and voluminous compositions that will perfectly harmonize with the image and highlight the chosen outfit. In addition, each ornament in this nail art is unique.
What do you need for design and acrylic sculpting on nails?
Performing the work requires special tools and materials:
- round natural brush with a sharp tip;
- a cup or stack for monomer liquid;
- acrylic powder of different colors;
- monomer (liquid).
To further decorate your nail art, you can stock up on acrylic paints, a thin brush, various decorations, and glitter.
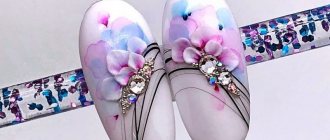
Acrylic nail sculpting for beginners
In the early stages of learning, it is better to practice simple designs that involve compositions of similar or monotonous elements.
Simple floral acrylic nail sculpting step by step:
- Prepare the nail plate, degrease it. Dip the brush into monomer and then into acrylic powder. Place the material on the nail.
- Form an even, smooth ball. Wait 10-15 seconds for the acrylic to begin to harden.
- Press the tip of the brush to the edge of the ball in the middle, apply a little pressure and pull in the opposite direction, creating a petal.
- Slightly adjust the contours of the stucco molding.
- Continue forming the pattern. You can lay out 2 acrylic balls at once.
- Complete the composition with flowers of other shades. Smooth gradient transitions look good. To do this, dip the brush with monomer first into light and then into dark powder.
- Carry out the sculpting in exactly the same way as in the previous paragraphs, drawing out the petals.
- Make leaves in the same way. You can slightly lift their edges above the plane of the nail, separating the dried area of the stucco with a brush.
- Place a small contrasting acrylic ball in the center of the flower.
- Make a hole in it using drilling movements of the brush.
- Repeat the steps for the remaining colors.
- Glue beads, artificial stones or broths into the resulting holes. Decorate the manicure with painting and shimmer (optional).
- Practice sculpting flowers and leaves using different colors of powder and accessories.
It is important to frequently wipe the working brush while working; to do this, you should prepare clean napkins in advance.
How to choose acrylic powder
When choosing, you should consider some points:
- High-quality acrylic powder does not spread or crystallize. The material is laid in a dense layer on the nail plate and can be easily corrected and further processed.
- Thanks to the porous structure of the substance, the natural nail plate receives enough oxygen and “breathes”. This largely determines the duration of wear of the coating and its durability. A manicure made with low-quality materials can harm the nail plate. In addition, such a coating will be subject to detachments, and its service life will be significantly shorter.
- Acrylic powder is white or transparent, but thanks to the use of dyes it is painted in a variety of colors.
- When choosing materials to create a design, it is best to use liquid and acrylic powder from the same manufacturer.
What do you need for acrylic nail sculpting?
Acrylic nail sculpting, although considered simple, still requires some creative skills, imagination, patience, and meticulousness in work. In addition, the quality of the nail design is determined by the presence of all the components necessary for sculpting, so it’s worth purchasing in advance:
- acrylic powder for sculpting nails;
- brush;
- degreasing mixture;
- clear varnish;
- plastic container;
- monomer (liquid).
Before work, be sure to cover the table with oilcloth, since acrylic that gets on the surface and sticks to it will be very, very difficult to remove.
Acrylic nail sculpting: step by step
- Pour the required amount of acrylic into the prepared container.
- Artistic design can be done directly on the nail plate or on tips. Pre-prepare the nail plate, apply extensions if necessary, or cover the nail with a layer of gel polish.
- First, the brush is dipped in liquid, then in powder of a certain shade. After this, twist the brush a little to get a ball. The size of the ball will depend on how deep you go with the brush.
- Now the resulting ball is placed on the plate in the place where the acrylic molding will be formed. Give the ball the desired shape. To continue working with the fragment, dip the brush into the composition again and continue working. To create perforations, when working with a brush, apply a little pressure on the lump to work out each contour.
Performance
The sculpting process is very difficult for a non-professional. Its main difficulty is precisely that all work must be completed at maximum speed, before the acrylic dries. Below we describe how acrylic sculpting is done on finished extended nails step by step.
[yandex3] [google3]
- Dip the brush into the monomer;
- Dip a damp brush into the powder. You will see that a ball has formed on it, from which you will form one of the elements of future modeling. You can vary its size using the depth of lowering the brush into the monomer. If you wet only the very tip, the ball will turn out tiny;
- Place the ball on the nail and form the desired shape of the element as quickly as possible. Repeat this element on all nails, according to your idea;
- Move on to the next element. Move from large to small and from the base of the figure to the top;
- Wait for the acrylic to dry. After this, you can try to paint the figurine using acrylic paints. But you need to take into account that they can soften acrylic, so you should act carefully.
After the molding has dried, you need to give the final shape to the free edge. After this, you can cover the nail with a top coat of acrylic fixer. Video lessons show more about how to sculpt nails with acrylic.
Tips for working with acrylic powder
All elements are formed separately from each other using powder of different colors. We advise you to make the large elements first and then move on to the small ones to control the creation of the design and the overall composition.
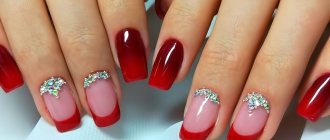
Depending on your idea, the acrylic composition can be located along the edge of the nail, in the center of the nail plate, or on the top layer. However, the pattern should not be placed near the cuticle. The composition will not last long in this place. According to the author's plan, you can add rhinestones, sparkles, bouillons and other decorative elements to the composition.
An important condition for high-quality manicure is the correct placement of the composition on the nail. The main elements should not be scattered chaotically, as such a manicure will look ridiculous and lacking in style.
In what cases is nail art appropriate?
The design with acrylic molding (the photos demonstrate this) is not entirely comfortable for everyday wear and has some disadvantages. If you constantly work with your hands, then such a manicure will be inconvenient because it has convex elements. With constant contact with chemicals and water, it loses its resistance. Also, elements of acrylic modeling cling to clothing and fabrics. When choosing such a design, you must follow several rules, otherwise it may suffer and cause a lot of inconvenience. This type of manicure is most often done for weddings or before important events, for anniversaries and social occasions.
Moreover, it should be noted that each event has its own special design. Brides often opt for a touching, delicate design with flowers, hearts and butterflies. Business women often choose compositions with animals, reptiles and bright flowers and complement them with various decor. This manicure not only lifts your mood, but also adds self-confidence. For events, you can choose a manicure that matches the color of your dress or handbag.
But when preparing for an important event, even if you know how to do acrylic sculpting step by step, be sure to practice. If you don’t have enough experience yet, seek help from professionals so as not to be disappointed with the result. You can hone your own skills later.