What is stamping
Stamping - from English. language "stamping". This is a modern nail design technology using a metal stencil, stamp and spatula. Provides the opportunity to apply equally complex designs to any nail.
A stamping kit is offered in any specialized store. Choose high-quality sets, because the appearance of the manicure depends on this. The scraper must be tight to effectively remove excess varnish. Choose a stamp that is moderately elastic so that the design transfers well. Varnishes are preferably thick, with a bright and dense color, so that the design is printed as accurately as possible.
Set for stamping with gel polish
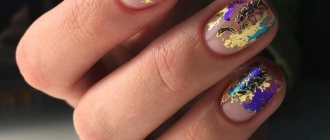
The metal stencil plate is produced in different sizes. The tool includes from 4 to 100 design options. Images vary in complexity. Both a minimalist style (lace, bows, flowers) and complex patterns reminiscent of a mantra are in fashion.
The advantages of stamping include:
- ease of use of the kit;
- quick application;
- the ability to choose a design;
- amazing result.
Stamping kit
The full range of tools and items needed to perform stamping is very accessible. You can buy it almost everywhere - from stores with manicure supplies for nail technicians, to supermarkets selling it. Moreover, the price of such a set is more than affordable and, depending on the materials, the number of components and other factors, ranges from 40 to 200 rubles (as of 2020).
Nail stamping, the process of which is presented in the video, has gained wide popularity due to its high ease of use. It is equally often used by both masters when carrying out design in salons, and those who like to do their own manicure at home. If you have certain skills and knowledge, the result is simply excellent.
Before we talk about how to use a nail stamp, let’s discuss what is still necessary for stamping design. So, the standard stamping kit includes:
- A metal plate with patterns embossed on it;
- Scraper;
- Rubber pad - stamp.
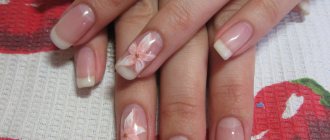
Naturally, this is not enough to create a stamped nail design like the one in the photo. You will also need cotton pads and nail polish remover, as well as the coatings themselves, one of which should give a dense color when applied in one layer. This is very important, because otherwise stamping will not work. In addition, you will need a standard manicure set, a base for varnish and a top coat - a fixer.
Execution technique
Beginners have a question about how to do stamping. Let's look at the detailed instructions:
- Apply any coating to your nails: polish, gel polish, extensions. Perform a manicure according to all the rules.
- Choose your favorite stencil plate and nail polish color. You can do stamping with gel polish. If the set is new, remove the protective film. Apply a layer of varnish to the entire surface of the print, avoiding going beyond the boundaries of the design.
- Remove excess varnish from the stencil plate using a scraper blade. The excess will remain on the scraper and the varnish will remain on the engraved surface.
Stamping on gel polish application technology, quick painting. Geometry on nails
- The next step is to apply the stamp. Place it close to the plate for 3 seconds, so that the entire area of the design remains on the stencil. Be careful not to blur the image. The drawing must be clear and bright, then the print will be of high quality.
- If you are convinced of the quality of the printed image, transfer it to your nail. To do this, attach a stamp with a design to your nail. Press the stamp firmly, being careful not to dislodge it. Evaluate the result.
- Clean any remaining coating from the stencil and stamp using nail polish remover.
- Carry out manipulations for the remaining nails.
- Secure the result with clear varnish or top coat.
- Remove polish from the side rollers using a special marker with a soaked tip or a cotton swab with nail polish remover.
Common Mistakes
However, despite the apparent simplicity and versatility of such a set, not everyone knows how to properly stamp nails. In order for the result to look high-quality and professional, you need to know a few secrets and rules.
The stamp varnish should be thick and rich. A complete print must be obtained the first time. In addition, it should not be too liquid so that it simply spills out of the stencil and smears on the nail. At the same time, the coating should not be too thick, since in this case, it will not completely occupy all the voids of the stencil. The scraper must be worked very carefully and quickly. If the varnish in the stencil has time to dry, it will not “adhere” well to the background coating of the nails.
When pressing the stamp on the plate, you must hold it strictly vertically. Also, you need to apply pressure perpendicular to the plate. And when transferring the design to the nail, you need to lower the stamp perpendicular to the nail and press firmly, making several pendulum-like movements. This will help to transfer the design evenly onto the nail.
Another reason why nail stamping may not give as good results as in the video is the quality of the kit. In particular, if the rubber from which the stamp is made is too hard, then the design will not be translated efficiently. And if it’s too soft, it will simply displace the coating from the stencil and the contours of the design will be unclear. A common reason is a bent scraper and plate, which does not allow for quick and high-quality cleaning and transfer. Last but not least is insufficient or excessive stencil depth.
Reverse stamping
Reverse stamping is the creation of a three-dimensional multi-colored pattern using a stencil. To make a unique print on your nails, you don’t need any artistic ability, you only need imagination and a minimal set of tools.
How to do stamping correctly? Secrets and lifehacks!