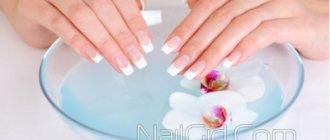
How to make a bump on your nails with gel
Creating the perfect manicure is a complex process with many subtleties. Many girls like the way plain shades of gel polish with even highlights look on their nails, but not everyone can achieve perfection in this technique.
The main problem lies in the unevenness of the nail - the presence of tubercles and dents leads to the fact that the gel polish is distributed unevenly. In this case, it is necessary to straighten the nail before application.
What is it for
The nail plate of different people has its own characteristics - some are lucky to have naturally smooth and strong nails, while others know first-hand what tubercles, peeling and other problems are. In addition, even on healthy and smooth nails, unevenness may appear over time, since frequent treatment with aggressive agents, physical impact and drying in a device negatively affect its condition.
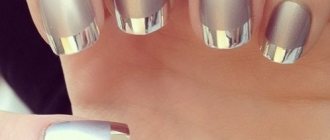
Nails without waves and dents
Leveling your nails with gel polish allows you to remove waves, bumps and dents, which otherwise would become more noticeable after applying a colored coating. But this is not the only advantage of the procedure.
Alignment has a number of advantages:
- The nail plate becomes stronger;
- The quality of the manicure improves - it will delight its owner not for several days, but for more than two weeks;
- The procedure is quick and takes about 10 minutes;
- Protection of the nail from mechanical influences;
- Aesthetic beauty – gel polish applies to smooth nails without streaking, forming an ideal surface.
Aesthetic beauty of nails
In other words, leveling is a procedure that will help create a beautiful manicure for a long time and strengthen the nail plate, making it less sensitive to various external influences.
The creation of nail architecture is carried out using specialized means. On the shelves of cosmetic stores you can find three types of suitable products:
- Biogel;
- Base for gel polish;
- Gel for extensions.
The use of each substance has its own characteristics, but they are all united by one important rule: the product must be thick, otherwise it will not fill the recesses on the nails and it will be impossible to construct the desired shape.
The main advantages of gel nail extensions
Before getting nail extensions, you need to carefully weigh the pros and cons, because any artificial materials on the surface of the natural nail plate significantly weaken it. Today, gel nail extensions are considered a more modern and harmless way of modeling tips than acrylic technology. Looking at the photo at the end of our article, you will see that artificial nails are practically indistinguishable from natural ones. Nail extensions made from gel material have a wide range of admirers, thanks to its undoubted advantages.
- Under layers of modeling gel that allows light, moisture and air to pass through, the nails are able to “breathe.” However, it should be taken into account that after removing the artificial material, weakened and thin nails require intensive restoration .
- Representatives of even the most sensitive skin can grow artificial ends, since this material does not cause irritation or an allergic reaction.
- Extended nails modeled with gel do not have an unpleasant odor.
- It is very convenient to work with the extension gel; it has a fairly pliable texture, does not spread and is evenly distributed over the surface of the nails.
- Artificial gel nails look just like natural ones. The even and smooth surface with a pleasant shine, as if straight out of a glossy magazine photo, evokes only admiration.
- With the help of gel of different consistency, you can not only build up tips on forms and tips, but also use it for voluminous compositions on the surface of the nails.
The disadvantages of gel modeling include the fragility of artificial nails, which can break or crack. In this case, it is impossible to repair the damage. The only way out of this situation is to re-build, observing all the rules and strictly following the technology.
Using a shellac base
The most popular way to treat the nail plate when performing a combined manicure is to level it with a gel polish base. Experienced professionals have proven their success with such products as Kodi, NeoNail, Komilfo, Adore Professional, etc. These rubber-based products have a thick structure and effectively form a smooth surface, removing all unevenness.
Leveling the nail plate with a gel polish base is carried out in several stages:
Stage 1: Preparation
The nails are given the correct neat shape, then they are degreased with any suitable means.
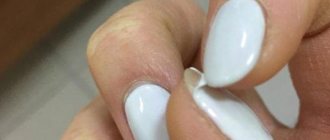
Stage 2: Applying base
Having picked up a drop of the base composition with a brush, you need to apply it as close to the cuticle as possible and distribute it evenly - first in the center, and then on the right and left as shown in the photo.
Stage 3: Sealing
Having turned the nail, seal the end with a brush, and then allow the base to dry thoroughly.
When shaping the architecture of the nail plate, you don’t need to worry about the product laying down in a thin layer – the brush included with the base is very soft, so uniform application is guaranteed.
After application and drying, gel polish is applied.
Using biogel
Biogel is a special type of manicure product designed for thin nails. The advantages of using it are that leveling the nail plate with gel polish is accompanied by the application of a protective layer that prevents peeling and other problems.
The disadvantages of biogel include the difficulty of application - the brush should hardly touch the working surface. The coating of the plate occurs due to the tension of the thick composition. When choosing a product in a store, you need to pay attention to the brush - you should choose one that is very soft, round and with long bristles. The second disadvantage of using biogel lies in the need to purchase an additional manicure product, because it does not replace the base, but is applied on top of it.
Leveling with gel under gel polish is carried out as follows:
- First you need to prepare the nail - shape it and degrease it;
- The second stage is to apply the base over the entire surface and seal the end;
- After the coating has dried, a layer of biogel is applied.
- Dry it like a simple gel polish - 30 seconds in an LED lamp and 2 minutes in a simple ultraviolet lamp.
- Before applying the color coating, be sure to remove the sticky layer.
Since applying biogel requires some experience, it is not recommended for beginners, but if you want to learn, you need to prepare for the fact that this may take a lot of time. The correct application technique is presented in the video.
Correction
Types of correction
Modern ladies don’t have a lot of free time, so they often plan their day literally minute by minute. It’s good when correction of extended nails with gel is planned, but there are also emergency cases. To include a visit to a nail salon in your schedule, you need to know what types of corrections there are and how long they last.
All types of correction are divided into three large groups:
- Minor involves minor repairs of cracks, scratches, and small chips. This also includes changing the decorative coating, eliminating air pockets in case of minor detachment. Depending on the number of areas to be repaired and the degree of their damage, it is worth allocating from half an hour to one and a half hours for the procedure
- Medium refers to planned, it takes about two hours to correct overgrown nails
- The big one includes a complete replacement of the artificial coating if it is severely damaged, and a radical change in the shape of the nail. It will take about an hour for one finger
Correction may differ in technology and time spent, depending on the material used. So gel and acrylic nails will take much longer to repair than shellac nails. For many, it is more convenient to carry out this procedure at home on their own, since they do not have enough time or money to constantly visit a specialist. But for this you need to know how to do nail correction and strictly follow the instructions.
In what cases is it needed?
Nail correction is needed in several cases. It must be done when the nail is broken. If this happens, you should try to glue the damaged area. But this is possible if a minor breakdown occurs. If the damage is more serious, the work of an experienced technician is required.
Nail correction is done with acrylic or gel.
The essence of the procedure is that a special material is applied to the regrown nails. It should be taken into account that the originally selected material is used for correction. There are the following types of correction of overgrown nails:
- if they have minor damage or chips, scratches or peeling, then a minor correction is carried out;
- medium correction is carried out when the nail grows, it is necessary in order to smooth out the difference between the extended and natural nail; this procedure is done several weeks after the initial procedure or after correction, and the time depends on how quickly the nail grows;
- when the nail plate is detached, displaced or broken, a more serious and extensive correction is required.
Read also: Piercing and tattooing is a fashion that has a long history
Many people are interested in the question of why the extended nail detaches after the procedure. There are the following reasons for this:
- First of all, detachment can occur due to the fact that the nails are handled carelessly;
- the length of the nails was initially chosen incorrectly, that is, if the nail is too long, it may become deformed, which leads to detachment;
- allergy to the applied material; in some diseases, for example, diabetes, detachment of the material may occur;
- negligence in work, which occurs due to inexperience or absent-mindedness of the master; When contacting a specialist for the first time, you should make sure of his professional qualities, see if he has certificates, information about trainings, courses, and also look at previous versions of his work.
Important! Most often, a good master is found on the advice of friends. You can find a professional based on reviews from regular clients. They will tell you where it is best to carry out the correction, and provide reports with photos about the master’s work.
How to make a correction?
Correction of an overgrown nail can be done not only by a professional nail technician. With minor skills, you can carry out this procedure at home. Perhaps, at first, this manipulation, performed at home, will not be so ideal.
But over time, you can learn to do it more professionally, and less and less time will be spent on processing. To properly perform a manicure and correct the nail plate, it is important that all actions are carried out in a certain sequence. This will allow the work to be done at a decent level.
You need to learn how to use devices and means for correcting the nail plate. It is recommended to remove the gel layer using a special device. To remove the old layer, it is better to use a router. This is a special machine with various attachments for filing and polishing the nail.
When working with cutters, you can quickly remove the varnish without damaging the plate. All manipulations should be done step by step, which will ensure quality of work and longevity.
The technique for carrying out the correction procedure at home includes the following steps:
- Before the procedure, hands should be disinfected;
- old varnish is removed from the nail plate;
- using a special product, remove the cuticle;
- after removing the old layer, the nail plate should be degreased; the degreaser is applied to the nails, trying to include the skin of the fingers;
- processed using a file, using it to file away the places of delamination; during operation, the nail file must be kept parallel to the surface being treated;
- using a nail file, the edge of the nail is processed, as well as the stress zone, and 2/3 of the material is removed; During work, a lot of dust appears, it should be removed with a brush;
- the nail should be disinfected;
- after that, another layer of material is applied to the nail - it can be acrylic or gel coating; when applying it, it is important that the material does not get on the skin in the periungual area; it is better to use a wide flat brush, which will allow you to paint the base evenly and avoid staining;
- after this manipulation, the hands are placed under an ultraviolet lamp to harden the applied material;
- you should make sure that the nail plate and coating area are perfectly flat; if there are irregularities, they are leveled using a file, while the processing is done with a coarse file, and the plate is polished with a soft one;
- if there is a detachment of the native and artificial nail, it is glued or cut down;
- at the final stage, varnish is applied to the plate and the design is made.
After all the manipulations, special oil is applied to the cuticle. To soften, you can use grape seed, coconut or almond oil. If the procedure is done at home, the extension material usually does not change.
If desired, you can change the color of the manicure. It is not recommended to change the color to a light one, as the previous shade may bleed. If you want to change the color, you should completely remove the previous coating and then apply a new one.
Important! Many clients often have the question of what to do if the nail grows in, how to deal with this problem. To eliminate it, a special device is used; such laser correction should be carried out only by an experienced specialist.
Using extension gel
This option is suitable for those whose nails become deformed as they grow, because such a gel reliably retains its shape. But its use is accompanied by one big drawback - such a gel does not dissolve, but is only cut off, which can negatively affect the structure of the nail.
The gel strengthening technique for extensions is performed as follows:
- First, you need to disinfect your hands and treat the nail plate, including degreasing;
- Then the base is applied and dried;
- The base layer is immediately covered with gel;
- The finished manicure is dried in a lamp and trimmed with a nail file.
In pursuit of the perfect manicure, do not forget that nails need special care. To straighten the nail plate, it is not enough to resort to the above materials; you need to provide the body with the necessary amount of vitamins, use nail strengtheners, make special masks, etc.
What is gel for nail extensions
The history of the creation of special polymer products for nail extensions goes back to the dental practice of the twentieth century. The fact is that first acrylic and then UV gel for strengthening natural and modeling artificial nails were created by a dentist based on materials for filling teeth. These two main substances used for artificial manicure are very similar in chemical composition, therefore the gel extension technology is almost no different from acrylic technology.
Recently, most manicurists working in professional salons or at home prefer to use exclusively UV gels for extensions, because they have significant advantages compared to acrylic:
- the composition of gel bases is as close as possible to the composition of natural nails;
- after drying in a special lamp, gel nails acquire an ideal shape, high strength, smooth surface and natural shine;
- Gel bases, as a rule, contain natural resins that help strengthen brittle nails;
- it is a breathable material and does not contain harmful acids, therefore it does not cause much harm even when wearing artificial manicure for a long time;
- most modern gel bases are self-leveling, without a strong odor and do not require removal of the sticky layer, so working with them is easier, faster and more pleasant;
- modern gel extension technology minimizes the harm of special products for the nail plate and cuticle, and drying in a lamp helps to avoid the proliferation of fungus or other pathogens that often live on nails;
- The range of products for gel extensions is very wide: in addition to the usual transparent ones, manufacturers offer camouflage gels in natural beige and pink shades, stained glass and colored.
Single phase
This gel base belongs to the “three in one” category, because the product combines three layers necessary for the correct extension technology. All ingredients are mixed in one jar: base, modeling and protective. This material is ideal for beginner nail technicians. However, single-phase extension gel has a liquid consistency, so not all beginners will be able to immediately make friends with it.
- Cardamom - beneficial properties and contraindications. Use of cardamom in cooking and folk medicine
- Heparin ointment - what it helps with, instructions and reviews
- How to get rid of nail fungus at home. Quick relief from nail fungus
Two-phase
A two-phase extension system involves the use of a pair of products of different consistency and purpose, applied separately. The base coat has a low viscosity because it acts as a primer. The second phase of the system is intended for the architecture of the nail - the sculptural layer. It has a higher viscosity and has a dense, thick consistency, so it makes the nail modeling procedure a little easier than when using a single-phase option.
Three-phase
This system differs from the previous one by the presence of a third layer. In addition to the base and modeling composition, the kit includes a protective agent that allows you to create a finishing coating to minimize the influence of adverse environmental factors on artificial nails and extend their wearing life. The three-phase gel system is considered the best for modeling, therefore it is used by most professional craftsmen.
What it is?
Everyone's nails have their own individual texture. Those girls whose hair is naturally smooth and without flaws do not experience problems. But some people have nails with an uneven surface, extremely brittle and sensitive. And during the manicure procedure, nails are subjected to additional tests in the form of filings, grinding, and hardware, which creates additional stress on the nails. You need to straighten your nails so that their correct architecture is formed. In addition, this will prevent such troubles as varnish running, uneven coating, and coloring of the cuticle area.
Alignment takes place in the following two stages:
- the first layer is a primer, designed to mask nail defects;
- the second is the finishing one, thanks to the even spreading of the base, the nail takes on a natural, even shape, fading away in the area of cuticle growth; the result is a perfectly smooth nail surface ready for decoration.
Leveling the surface of the nail is an important stage of manicure. It has advantages such as:
- the ability to further strengthen nails and extend the life of the decorative coating;
- creating a geometrically correct surface of the nail, which will give the correct direction of its growth;
- simplicity of the procedure - it takes no more than 15 minutes, and no additional funds are required to carry it out; it is important to carry out the leveling procedure if the previous manicure is removed with a device, since it is necessary to leave the base layer intact in order to further protect the nail from external influences;
- aesthetics - a smooth nail plate will make the glossy highlights of the nails ideal after applying the decorative coating.
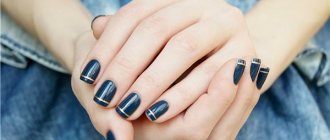
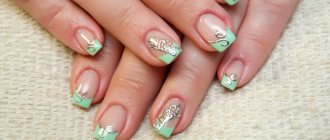
Bright gel nail design ideas
Correctly modeled extended nails of any length are difficult to distinguish from natural tips. If the master knows all the intricacies of gel modeling, then step-by-step execution of this procedure will not take much time. The result of professionalism and skill level is also measured by the ability to create an original design on the surface of the nails. Whether it's a French manicure, a monotonous coating in pastel colors, lunar nail art or decor in the form of iridescent stones, your hands should have an excellent look. A wonderful photo gallery of fashion designs of 2014 will give you aesthetic pleasure and inspire you to new experiments.
The gel nail extension technique is performed on both forms and tips. Step-by-step instructions for modeling artificial ends, presented in the final video lesson from Svetlana Sokolova, will introduce you to the nuances when working with tips and gel. Neat extended or natural nails should delight their owner. Be beautiful and happy!
How to choose?
The easiest way to straighten the nail plate is to use gel polish. This method can be done even by a beginner. First of all, you should pay attention to the bottle with the base - it should have the label “with rubber” written on it. Rubber makes the composition more viscous, thick and flexible. It is thanks to this rubber consistency that the depressions are filled and the tubercles on the nail are leveled, and an arch of the correct shape is formed. The advantages of this method are as follows:
- base with a rubber base is usually self-leveling;
- eliminates natural nail defects;
- application speed.
There is an option for straightening the nail using biogel. Its advantage is that it not only smoothes the nail, but also heals it thanks to the vitamin and mineral complexes in its composition, proteins and resins. Biogel has the following advantages:
- natural composition;
- healing effect;
- acceleration of nail growth;
- ease of removal of the coating.
However, it is worth noting that working with biogel is difficult. The brush should not touch the working surface of the nail - alignment should occur from the tension of the composition. When choosing biogel in a store, carefully consider the brush - it should be soft and have long bristles.
The third option is leveling the nail plate with gel. Here it is worth remembering that the gel cannot be removed with a solvent - it can only be cut off with a manicure machine or an abrasive file. The composition of the gel is relatively non-toxic and safe. It covers and strengthens the nail well, providing an even decorative coating and its resistance to external factors.
Finally, you can use acrylic powder for leveling. Everyone knows that acrylic is used for nail extensions. However, this material is very versatile. It is more difficult to work with than the above-mentioned levelers, but in the end you will definitely be satisfied with the result. Acrylic powder perfectly strengthens nails, serves as a strong base for broken nail corners, and allows the coating to be durable for a long time. The choice of method and material for leveling the nail plate is yours, but remember that you should not be too complex because of small natural defects of the nails.
Pros and cons of extended nails
Gel nail extension service is popular among women due to a large number of advantages:
- Natural look after the procedure.
- Possibility of masking any defects of natural nails.
- A huge number of design options: patterns, pictures, drawings.
- Durable coating that lasts for a long time. It does not need to be renewed every 2-3 days, like regular varnish.
However, the nail extension procedure is not so harmless as not to note several disadvantages:
- The procedure takes a long time - 2 hours on average.
- The service is not cheap.
- The condition of your own nails worsens, which is especially noticeable after removing the extensions. To get your nails in order after extensions, you will have to carry out caring procedures.
- The coating needs correction every 2-3 weeks, otherwise your own nail grows noticeably and the overall picture looks sloppy.
- To remove the gel coating, you need to contact a specialist.
The right length for any nail shape
The basic rule of any manicure is the same length of the nail plates on both hands. If you accidentally break one nail, the rest will have to be shortened to its length. This will give your nails a neat appearance, and your hands will look neat even without applying varnish.
The question of how long fingernails should be is decided by the master, focusing on the condition of the nail plates. If they are thin and weakened, then their edge should not extend beyond the tips of the fingertips.
Otherwise, your nails will break and peel. Those with strong, healthy nail plates can afford longer lengths. You also need to consider what your hobbies and activities are. If you play musical instruments or often bake delicious desserts, then it is better to choose a short manicure.
You can determine how long your nails should be by looking at the shape and size of your hands. Girls with long, slender fingers should not be afraid to keep their nails short: no matter their length, their hands will look feminine and elegant. Long nails look better on short, large fingers. It is also worth paying attention to the size of the nail bed: the shorter it is, the longer the nail plates should be.
When choosing how long your nails should be, you need to take into account the future shape of the nail plate. The golden rule of manicure is that its edge should mirror the shape of the cuticle. However, many modern nail design options do not meet this rule. For example:
- The round shape of the nails suits girls with large fingers and wide palms.
Most often, this design is done on short nails, whose length does not exceed 3 mm from the tip of the finger. This manicure is versatile. Beautiful round nails will decorate both everyday and festive looks. Typically, a round shape is chosen by women whose activities involve playing musical instruments, working with children, and medicine. To design the nail plate in the form of a circle, just carefully round off the two parts of the nail and file the tip.
- The square shape of nails suits girls with long, narrow fingers.
The square looks great on both long and short nail plates. The shape is quite simple: file the edge of the nail in a straight line, holding the file clearly perpendicular to the finger, soften the edges a little. Sharp edges break, often catching on clothing and other objects.
- Square nail shape with rounded ends. The rules for creating this form differ little from the previous one, but the manicure looks more natural and gentle.
The rounded square shape is more convenient in everyday life, since smooth corners do not cling to everything. “Soft square” is often chosen by men. This form is considered the most resistant to chipping and cracking. A rounded square looks good on nails of medium and short length.
- The oval nail shape suits almost everyone, but looks best on medium to short length nails.
How to make a beautiful oval manicure? First, outline the oval outline by moving the nail file from the side edges of the nail to the center. Trim the edges until you get a perfect oval. Hands with such a manicure look very gentle and sophisticated.
- Square-oval or rectangular nail shapes are the choice of girls with thin and graceful fingers. This manicure combines square and oval shapes. The sides and top edge of the nail plate are cut out in a straight line, the corners are smoothed. The length of the side edge should be half the length of the top of the nail. First, file down its upper free edge (1/2 of the entire width), move to the edges, and then smooth the corners.
- Almond-shaped nails are a great option for girls with long, graceful fingers. Almond manicure makes hands more feminine and elegant. “Almond” is especially popular; it is comfortable for everyday wear and suitable for any event.
You can adjust the manicure yourself. To do this, just carefully file the edges, moving the nail file in one direction. Fans of fashionable nail trends are often interested in how long nails should be for an almond shape. There is no single rule. The main thing is that you can get a clear almond figure.
- Stiletto -shaped nails are long nails with sharp tips.
This shape is chosen by bright, stylish girls who love to attract admiring glances. “Stilettos” visually lengthen the fingers, making the hands even more feminine and sophisticated. This form is not the best option for everyday wear, since “stilettos” often break and cling to clothes and other objects. The stiletto-like shape is created using extensions. The free edge of the nail is twice the length of the natural plate. We will tell you how long nails should be for extensions a little later.
- The triangular shape of nails looks great on small, graceful hands.
The technology for performing a manicure is practically no different from creating “stilettos”. The only discrepancy is that the narrowing of the plate begins from the middle of the free edge, and not from the beginning, as with the stylet-shaped form. How long should nails be for a triangular manicure? To get a beautiful sharp triangle, your nail plates must be long enough. Moreover, a high-quality and durable manicure can only be achieved on strong, healthy nails.
- The ballerina nail shape is a trendy design that combines square and almond shapes.
The sides of the plate are slightly beveled, as with the almond type. The upper part is made in the form of a straight line. The result should be an elongated isosceles trapezoid. The name “ballerina” was formed due to the fact that the nails look like pointe shoes. Due to the external similarity, some craftsmen call this form a less pleasant name - “coffin”.
Read also: Soft liquid for nail polish remover Nail Polish Remover with vitamin E and chamomile
Why is it necessary?
We all have different nail structures. Lucky are those who have smooth and even nails. But some have a hypersensitive plate (there are also irregularities, detachments, and tubercles). In addition, during manicure the nail plate is subjected to processing: polishing; removing old gel polish with a device, which has a bad effect on the condition of the nails.
plum
To give the correct shape, a procedure is performed to level and strengthen the nail plate, thereby getting rid of various tubercles and depressions, waves and excess gel polish. The first layer of varnish is usually a primer; it hides all the main natural irregularities. The second layer is evenly distributed over the nail, gradually disappearing in the cuticle area, forming an ideal surface.
Pros:
- Leveling will strengthen the nails, and the coating will last for several weeks.
- The ability to give the correct shape to the nail. With regular alignment, the nail will grow in the desired direction.
- Affordable and simple! There is no need to purchase additional products to strengthen the nail plate; the procedure will take about 10 minutes.
- Leveling, when removing gel polish with hardware (hardware manicure or hardware pedicure), we do it so that a base layer remains. A thin layer of base coat will cover and protect the nail.
- The perfectly smooth surface gives beautiful reflections from different light sources.
Red Patrice nail design 305 on nails
Why do irregularities appear?
Wavy, ridged and nails are a problem! With such nails, any manicure will not look perfect. Often we do not think about the reason for the deplorable condition of our nails, but this issue deserves special attention.
One of the indicators of our health is our nails. For example, if your nails become covered with a groove near the cuticle, then you should take a course of vitamins and microelements. Ribbed nails can appear as a result of minor injuries, and can also be the cause of fungus, psoriasis and other problems in the body.
How to level?
The procedure for straightening the nail plate is very simple. It is necessary to take into account the specifics of the material.
Suitable for strengthening nails:
- base for applying gel polish;
- biogel;
- various extension gels.
Any product that forms the basis of a manicure should be thick. Liquid bases or gels are not suitable. They will simply flow off the surface of the nail.
Base alignment
The base should be thick, preferably using rubber. The thicker it is, the easier it is to strengthen it. More liquid products will quickly flow down to the side rollers.
The following bases are suitable:
- Kodi;
- Komilfo;
- Lovely Base;
- NeoNail;
- Adore Professional.
Base alignment
Strengthening technique:
- Prepare your nails.
- Apply a drop of base of the desired size with a brush in a thin layer.
- Place a drop in the apex area (almost near the cuticle). Pull it towards the cuticle and stretch it in 3 movements. The first is in the center, the second is on the right edge, the third is on the left edge. Don't be afraid to ruin everything. The base brush is very soft, it will not push through the drop, so go ahead with confidence.
- Use the corner of the brush to form the shape of the nail.
- Turn the nail (hand) over, seal the end and dry thoroughly.
Rhinestone design on nails
Leveling with biogel
The choice of most girls will be biogel. It has a thick consistency and is highly soluble. Manufacturers produce special biogels for thin nails. This will be a real salvation for problematic nails with detachments. Choose a soft brush with a round shape and long bristles. It should practically not touch the nail at all. The biogel should stretch due to surface tension.
The following biogels are suitable:
- Bio Stretch Gel (BSG);
- Atica TM;
- Creator;
- Yoko;
- El Corazon
Leveling with biogel
Before leveling with biogel, be sure to apply a base layer.
Life hack - How to make perfect highlights?
You won't get a perfect highlight without a round lamp. Its appearance directly depends on the light source. Under a regular lamp it will appear square, angular or oblong. A beautiful round glare can only be obtained from a round lamp. In its absence, it will be very difficult to form it.
To get the perfect glare, a regular round table lamp will do. After applying the strengthening, the nails can be held under a regular lamp for 20-30 seconds, and then sent to an LED or UV lamp.
PS: Subscribe to my blog and Yandex Zen channel so you don’t miss anything.
Use of channel materials is allowed only with an active link to the blog
BestNails54.ru !
Gel coating
The gel is a synthetic substance that hardens during the polymerization process. It helps to model nails, lengthen or change their shape.
The polymer coating strengthens and smoothes the nail plates. The gel is applied to the natural nail, and it does not lengthen as with extensions. The polymer layer is much thinner, the nails look natural.
If desired, you can apply varnish to the coating, but even without additional design, the nails look aesthetically pleasing and stylish.
This manicure is suitable for those who want to create a natural look. You can coat your nails with polymer not only on your hands, but also on your toes.
Instructions for increasing
You can grow your nails in two ways: on the lower or upper forms.
The technology for gel extensions on lower forms is:
- treating hands with antiseptic;
- degreasing nail plates;
- removing the top shiny layer with a file to achieve a matte surface;
- treating the nail shaft area, degreasing with a cotton swab dipped in a special solution;
- applying a universal product as a base coat and top layer;
- drying by placing your fingertips in an ultraviolet lamp for 2-3 minutes;
- adjustment with a nail file if necessary;
- placing the form under the nail exactly in relation to the edges of the form so that the gel layer fits evenly to the plate;
- applying droplets to the nail with a brush, starting from the tips, while in the center you can make a seal, slightly turning the nail to give it a beautiful shape;
- Secondly placing the fingertips in a lamp to dry for subsequent application of another layer;
- lifting the nail from the edges of the bend in order to align and form a drop;
- degreasing the plates;
- leveling with a nail file to give the desired shape;
- grinding, surface leveling;
- removing small nicks;
- giving smoothness to the top coating;
- removing dust from the nail plate using a cotton swab;
- applying the finishing layer;
- dry for up to 3 minutes;
- degreasing special means.
The method of extension to the upper forms is simpler. Forming on bends is not necessary; the nail turns out quite even. You just need to practice a little beforehand and you can do a manicure at home no worse than a professional one.
When building on top forms, acrylic is not used. We will only use gel, but the main thing is to strictly follow all stages of the procedure and properly treat the nail plates before extensions. So, first the master and the client must treat their hands with disinfectants.
- Prepare the nail plates.
- Remove the top shiny layer.
- Push back the cuticle.
- Remove growths from the surface of the nail plate.
- Select the top mold for each nail separately.
- Place gel in the center of the mold for further construction.
- Dry your nails in an ultraviolet lamp.
- Apply the stencil to the cuticle area.
- Apply a layer of gel to the mold.
- Place your finger under the lamp for 20 seconds.
- Remove gels from the inside of the nail.
- Dry under the lamp for another 2-3 minutes.
- Carefully remove the top mold.
- Remove the sticky layer from the inside of the nail using a special product.
- Give the edges the desired shape.
- Remove dust with a brush if you need to add shine to your nails.
It is the upper forms that are more effective when building up if the plates are thin and small.
Advantages and disadvantages
Nails coated with a gel substance not only look natural, but also become stronger and more durable. The polymer does not spoil the nail plate, but thickens and evens it out.
Helium coating has a number of other advantages that speak in favor of this technology:
- The polymer base contains natural resins that strengthen fragile plates.
- Nails do not break on impact and do not peel off.
- The manicure lasts a long time (about 20-25 days).
- There is no need to remove the old material, just make a correction.
- The nail plates have the correct shape, look attractive, and shine.
- At the same time, the cuticle is processed; as a result, it grows back more slowly than with a regular manicure.
- It is possible to form any shape of the plate.
- Large selection of different shades of material.
- The base contains no allergens.
The main disadvantage of this method is the need for periodic correction. All other disadvantages depend on the correctness of the procedure and use of the nails.
What do you need
Everything you need to carry out the procedure for strengthening the nail surface can be purchased in specialized stores. Thanks to this, work can be carried out at home. To begin with, you will have to spend a large amount, but in the future it will pay off. You should buy quality products, even though they cost more. Poor quality material will only damage your nails.
Tools and materials
The first thing to prepare is the gel itself. To perform a helium manicure you need to purchase:
- sticks (metal or orange) for moving the cuticle;
- nail file, buff, polishing the nail surface, giving them the desired configuration;
- cuticle remover for unedged manicure;
- nippers intended for trimming manicure;
- primers that remove excess moisture - acid-free or acidic for normal or wet nails, respectively;
- synthetic brush for applying polymer;
- ultraviolet lamp for drying the material;
- cleaners that degrease the nail surface and remove the sticky layer;
- products for nail decoration (varnishes, rhinestones, sparkles);
- cotton pads, lint-free wipes.
Before purchasing materials and tools, you need to make sure the quality of the product. It is recommended to purchase products from trusted brands, based on user reviews.
Gel selection
When applying the polymer, three layers are formed: base, modeling, finishing. Each of them has its own functions. The base is the base on which subsequent layers are applied. Modeling – forms the nail plate, is responsible for the strength of the material. Finish – designed to protect against negative external factors. Therefore, special attention must be paid to the choice of material.
Getting beautiful, healthy nails largely depends on the quality of the material. There are several types of gels:
The “phase” of the base indicates the number of polymer layers formed.
Step-by-step instruction
The procedure for covering nails with gel is simple. You can do it yourself at home, without turning to professional craftsmen. The main thing is to follow the technology, performing all operations consistently.
How to prepare your nails
Before applying the polymer, the nails must be properly treated. It is recommended to take a therapeutic hand bath 2-3 hours before the procedure.
Preparation of the nail plate is as follows:
- Excess length is trimmed, the nail is filed, giving the desired shape.
- Degrease the surface of the plate using a cleaner.
- The cuticle is treated: with an unedged manicure, it is softened with a remover and pushed back with an orange stick; when trimmed, the cuticle is moved and trimmed with nippers.
- Sand the plate with a buff, carefully removing the top layer.
- Remove remaining fat with a cleaner.
- A thin layer of primer is applied to ensure adhesion of the polymer to the plate.
After treatment, you should not touch the surface of the nail, otherwise the material will lose its adhesive properties.
Stages of the procedure
The process of strengthening nails with gel consists of several stages. You can't miss any of them. Be sure to read the product instructions. Depending on the materials used, the process may vary slightly, but the basic steps remain the same.
No extension
Gel strengthening without extensions involves applying polymer to natural nails. You can coat both short and long nails with polymer.
After preparing and drying the nail plates, the main procedure begins. It is carried out in several stages:
- Apply a thin base layer, being careful not to get on the cuticles and skin. The sides and ends are carefully processed.
- Hands are placed in a lamp to dry for 1-2 minutes.
- A modeling layer is applied with a brush, with which you can adjust the shape.
- By placing your hands in the lamp, the gel is polymerized for 3-4 minutes.
- Clean the surface from the sticky layer. To give the desired length and level the sides, cut off the excess polymer by removing the sawdust with a brush.
- Apply the finishing layer.
- Dry the nails in a lamp by placing your hands there for 1 minute.
- Use a cleaner to get rid of the sticky layer.
The whole process takes no more than 1.5 hours. After the procedure is completed, the cuticles are soaked in emollient oil. Then you can coat the surface of the nails with varnish or decorate with additional elements.
With extension
To cover with extensions, you will need additional elements to model your nails. Tips are most often used as templates. In order for the nails to have a natural look, the shape of the tips must completely match the outline of the plate.
Further work is performed in the following order:
- Glue is applied to the contact area of the tips, applied to the nail, pressing tightly and holding for some time.
- The tips are cut with pliers, giving them the desired shape.
- File the joint at the top of the tip so that there is no step.
- Apply the base starting from the middle of the nail, gradually spreading to the edges. If a single-phase system is used, then the first layer can be colored. If it is three-phase, then it is transparent.
- Polymerize in a lamp for no more than 1 minute.
- Apply a modeling base and dry it again in a lamp.
- Remove the sticky layer, sand the artificial surface, and remove excess polymer with a brush.
- Cover the nails with the finishing compound, sealing the ends. The last layer is also dried in a lamp.
The extension process lasts 2-3 hours. For an hour after finishing work, you must avoid getting your hands wet to prevent the polymer from peeling off.
Nail extensions at home
When performing the procedure at home, you must follow simple rules:
- The top layer of the nail can be filed only until the nail becomes dull.
- You should regularly examine the nail from different angles to see subtle transitions and steps.
- After filing the keratin layer, you should remove nail dust with a brush, otherwise the work will be sloppy.
- Do not apply preparations with a gel texture like regular varnish. The drop is stretched with the tip of the brush from the center to the surrounding area, and then to the area under the cuticle.
- The curing time for different drugs in the lamp is different, so it is important to study the instructions for them.
Read also: The essence of the method and types of chemical peeling
Gel nail extensions step by step
The technology for gel nail extensions in single-phase and three-phase systems is absolutely the same, only the gels themselves differ. Either you use a single phase gel for all three steps, or three different gels.
- We carefully treat our hands with an antiseptic, paying special attention to the fingers and nail bed.
- We do a manicure in the usual way and polish the nail plates with a buff.
- We degrease the nails, then apply a bonder (dehydrator) and primer.
- We prepare tips or forms. We cut the tips to the required length with a tip cutter and sand them with a buff to get rid of the smooth surface, then glue them onto the nails. We secure the forms firmly under the nails; they should not move during the work.
- Apply the first base layer of gel. In a single-phase system it can be immediately colored, in a three-phase system it is usually transparent. We distribute using a brush into tips or shapes, creating the correct oval/rectangle, depending on the desired shape of artificial nails. Dry the layer in a lamp.
- Apply a modeling layer of gel. It should not be too thick and lumpy, you should strive for an even distribution. Dry it again in the lamp.
- We grind the surface of artificial nail plates, giving them the desired shape, length and arch. Remove dust with a nail brush or napkin.
- Then we apply the finishing gel and seal the ends of the nails. The last layer is also polymerized in a hybrid lamp.
Now you can complete the gel polish coating and design. If you decide to do without coating and nail art, you can apply softening oil to the cuticle.
How to choose all the necessary equipment for nail extensions
The first thing you should decide on at the start is what kind of lamp you need for nail extensions. New LED lamps are more expensive, but the drying process is noticeably reduced (from 3 minutes in a UV lamp to 30-45 seconds in an LED lamp - and this is for one nail). The lamp must be equipped with a timer .
The second question that needs to be resolved is how you will increase the length of the nail - using tips or forms.
To apply nail extensions with tips, you need to choose the size of the tip, which (and this is important) will fit perfectly with the curve of your own nail. Tips are easy to use, but one set may not contain all the sizes you need . Professionals buy large packages with different numbers of plastic nails.
What you definitely need to purchase for nail extensions on forms is special foil in rolls . Extensions on forms give a thinner and more perfect nail, but the process itself will take some practice.
What and where else should you buy for nail extensions? All other tools for the process should also be selected with special attention. brushes for gel or acrylic , of the highest quality . Any lint from the brush will give the coating a visible defect. Buy files with a reserve and check each time before work to see if the abrasive layer is clogged. You can't get a good manicure with an old nail file. All other auxiliary materials can be purchased in specialized stores.
How to adjust the shape to the nail
The form is a template with markings made of metal, Teflon and other materials. Durable reusable forms require careful disinfection after use, so disposable forms made of paper, thin plastic, and foil are often used. The form can be fixed at the top or bottom of the nail.
Installation and adjustment of the form is a very important stage on which the quality of the extended nail depends.
When using solid forms, you need to choose the size of the template so that it fits perfectly on the nail plate. The form is bent with light pressure and put on the nail through the provided hole. Once the shape matches the “smile line,” it is securely attached to the finger.
Disposable soft forms require additional adjustments. They make it possible to adjust the stencil to the contours of a specific nail plate. This is especially convenient when processing nails with non-standard shapes. If the forms are too soft, then experienced craftsmen advise gluing two pieces together.
The disposable template is removed from the backing, the perforated oval is extruded and glued to the back of the form, providing additional rigidity. The bottom edges are torn along a perforated line, the shape is slightly bent and placed on the finger. For orientation, there is a center line on the form.
Before final fixation on the finger, the form is given the desired slope - it should continue the line of the nail, without deviating up or down. If this creates gaps between the surface of the nail and the form, the cutout of the form is corrected with nail scissors. The shape must match perfectly with the root arch, otherwise the gel will leak into the resulting gaps.
After adjustment, the “ears” are carefully glued together to fix the shape on the nail. The bottom edges of the form are glued to the finger. The shape is adjusted individually for each nail.
Video instructions for nail extensions with gel polish
Lesson for beginners. Gel nail extensions in detail: