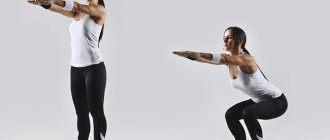
All ages are suitable for sports. But it is best to start training in early childhood, when the child is 4 years old. He still does not understand what laziness is, he endures pain tolerably, his muscles are elastic and stretch well. It is this property that helps the child achieve his goals. Good plasticity and stretching are simply necessary for all sports.
Judging by recent years, we take such good care of our children that we are ready to carry briefcases for them, even go to physical education. Let's remember ourselves, especially our grandparents who grew up under the union. Playing sports was practiced from kindergarten age; physical education at school was a very important lesson. We ran to training every day. With such a load, everyone was healthy and practically did not get sick. During sports, immunity is developed, the child becomes stronger and more resilient. That is why today’s children simply must have sports inclinations. We need to bring back sports traditions and take care of the health of the younger generation. Not allowing them to spend a lot of time on tablets and phones is an evil that ruins the health of our children!
How to teach a child to do somersaults
Babies are taught to tumble in early childhood. This technique is usually taught in kindergarten. Most children who attend preschool institutions are familiar with it and can complete this exercise. Difficulties arise for those children whose upbringing was done by their parents and grandmothers. Not everyone, unfortunately, takes their kids to training.
Tumbling is useful not only for children, but also for adults. This simple exercise helps to master coordination, helps strengthen all muscle groups, and improves blood circulation. This excellent method promotes grouping. By making such movements, the body instantly remembers the technique of movements, programs protective reflexes when falling, etc.
Teaching kids
Young children are more flexible and it is easier for them to perform some exercises than schoolchildren. Therefore, parents try to teach their children some exercises at this age.
- Place the baby on his back, ask him to bend his legs and pull them towards his tummy;
- Without leaving this position, teach him to swing on his back;
According to the diagram given above, holding the baby, help him to group, turn him over with a smooth movement.
- The baby shouldn't be afraid. You need to perform the movements with complete trust and calm.
- The baby should land on the back of his head, smoothly. Don't teach him to land on his tailbone.
- Do several repetitions together. At this age, it is difficult for children to remember the correct sequence.
Be close, coordination of movements during the baby’s training requires the supervision of elders.
Education for school-aged children
Teaching an older child is easier than teaching a toddler. Show him, if possible, how to do this exercise. If this is not possible, show a video of a child tumbling.
- When repeating, carefully watch his movements.
- If the movements are not clear, with errors, correct them when repeating.
- It is necessary to explain to the child what is wrong tactfully, without reproaches or accusations. Children are vulnerable and may become offended and refuse to repeat the exercise.
Before performing a somersault, do a light warm-up and stretching.
- Ask him to sit down, lower his head, and group himself.
- During the process, you can hug your knees with your hands, this will make it easier to roll smoothly.
- You need to lower yourself onto your back smoothly, leaning directly on your shoulders and shoulder blade, but not on your neck.
- Landing occurs on the butt, then on the legs.
- While moving, you need to maintain coordination so as not to fall.
You need to repeat the movements several times in a row until the child learns the lesson and perfects his skills. Only after he can complete the exercise without your help and get to his feet, can you invite him to try somersaulting in the opposite direction.
Reverse somersault training
Technically, performing a smooth roll back is much more difficult.
- To roll in the opposite direction, you need to squat down and push off with force.
- The child should roll quickly, while hugging his knees with his hands.
- Help the child roll over, support him as he rolls over.
- Tell me where to place your hands so that the coup is as soft as possible and the neck is not injured.
You can try the flip from the birch position, when your legs are raised and your torso is supported by your hands. It will be easier for the child to learn the rules and practice. The place for training should be free of unnecessary objects and corners. You need to lay a blanket down to soften the impact on the floor.
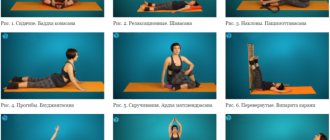
How to teach a child to make a bridge
Perhaps this is one of the most excellent exercises for strengthening the muscular frame and stretching the spine. The children's skeleton is very plastic, flexibility allows you to perform exercises of any complexity, including getting into the bridge position.
By doing stretches, the entire spine is trained, since all vertebrae are involved. This avoids curvature of the spine in the thoracic region. During school years, a child will have good posture and will not hunch over. With regular exercise, blood circulation improves, the digestive system is stimulated, and metabolism improves.
Features of preparation:
Before you begin the main exercise, you need to do several gymnastic exercises. They will allow you to relax your muscles as much as possible. Neither doctors nor trainers recommend performing such a figure without preparation.
- Lay the child on his tummy, ask him to simultaneously raise his outstretched arms and legs, and bend over, imitating a boat. You can rock like a boat.
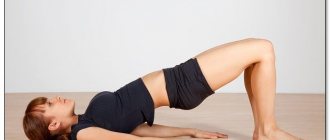
- Ask the child to roll over, bend his knees, and place his hands near his body. You need to raise your pelvis as high as possible without taking your hands off the floor. The fixation goes through the heels and shoulders with the arms.
- In a standing position, legs wide apart, bend over the back, reaching for the heels. We throw our heads back. You don't need to hold it straight, you might lose your balance.
- The child lies with his back on a large ball, while simultaneously reaching for the floor with both hands.
This set of exercises will allow you to quickly stretch your muscles, get into a bridge position, without much effort and safety nets.
You can get into position using a little trick. You need to come close to the wall, slowly lower it, and move your hands along the wall. Then, after holding the position for a couple of seconds, you need to rise back up in the same way as you lowered.
After lowering along the wall, you can proceed to completing the task with a safety net. The lowering is performed slowly, the position is fixed, after pushing off the floor you need to rise back.
The training continues until the child is able to complete the exercise himself. Children can get into this position after several stretches. As a rule, after completing the preparation for an hour, having studied all the rules of deflection, they easily perform this exercise without outside help.
Bridge from a prone position
If you can easily perform the exercises presented above with good amplitude, then you can immediately proceed to practicing the bridge from a lying position. Good natural flexibility of the back, sports background or young age give an advantage when practicing gymnastic exercises.
How to perform a bridge from a prone position:
- Lie on your back, bend your knees.
- Place your palms near your head, elbows pointing at the ceiling.
- As you exhale, stretch up, pushing your pelvis out and straightening your elbows completely.
- When you feel that you cannot bend further, hold in the pose of your limit.
- If possible, adjust your leg position by placing your feet closer to your palms.
- Gently lower yourself to the floor to the starting position without making sudden movements.
- To begin, stay in the bridge for 5-10 seconds, gradually increasing the time to 30-60 seconds.
What is important to know about the bridge:
- When performing a bridge, distribute the bend throughout the spine. This means that you must bend not only in the lumbar spine, but also in the thoracic spine.
- To bend in the thoracic region, you need to stretch your chest forward. This will help relieve pressure from the lumbar region and properly distribute the load on the spine.
- Try to gradually reduce the distance between your palms and feet to make the bridge more flexible and amplitude.
- The smaller the distance between the arms and legs, the more stable the bridge will be.
- During the bridge, look at the ceiling, not the floor, and do not create tension in your neck.
- When performing a bridge, your arms should be fully straightened, so at first it is advisable to perform this exercise in front of a mirror to control the correct execution.
Compare correct and incorrect execution:
- During pregnancy and immediately after childbirth
- If there is a hernia
- For problems with blood pressure and the cardiovascular system
- For eye diseases due to increased eye pressure
- During an exacerbation of spinal diseases
- After eating (within an hour) and immediately after waking up
- It is better not to stand on the bridge without and on an unwarmed body
If you feel pain in your back when performing a bridge, then it is better to stop practicing this exercise for a while. Continue to work on strengthening your back and developing its flexibility by performing the set of exercises from the beginning of the article. Gradually, your body will be better prepared to perform a quality bridge.
There is an opinion that a bridge with straightened legs is safer for the back. This position ensures uniform distribution of the load in the spinal region, better opens the thoracic region and reduces pressure on the lower back. However, in this position it will be difficult to work on reducing the distance between the palms and feet for a more flexible bridge.
We recommend trying different leg positions and observing the sensations in your back. Do not forget that to evenly distribute the load and deflection in the thoracic region (and not just in the lumbar region), you need to stretch your chest forward.
How can you make a bridge more difficult?
If you are confident in the bridge, you can complicate its implementation. Here are a few bridge modifications that will work extra muscles and help you push your limits.
The tiptoe bridge is a more difficult position in terms of maintaining balance and stress on the leg muscles. This position will help you further engage the lower body muscles during the bridge, including the adductors, quadriceps, and.
To perform this bridge modification, extend your leg straight up. The difficulty of the position lies in maintaining balance on three limbs, instead of the usual four.
An even more difficult option for maintaining balance in a bridge is to grab the opposite foot with your hand. This option will be useful for those who want to develop a sense of balance and coordination, as well as further increase the flexibility of their back.
Be careful! Perform this exercise only if you are completely confident in your abilities or with the support of another person to avoid losing your balance and falling.
This type of bridge can be achieved if you gradually reduce the distance between your feet and hands. Of course, such a position in the bridge is not available to everyone. But if you have good natural flexibility or a gymnastics background, then a super-flexible bridge will be within your power.
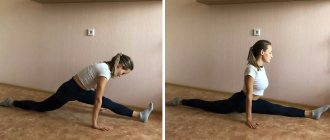
How to teach a child to do the splits
Mothers of all girls dream of beautiful and graceful stretching. To sit down quickly, you need to follow some rules. Otherwise, feeling discomfort and pain, the child will refuse to repeat the task. During stretching and training, the leg muscles are strengthened, the mobility of the hip, joints, and sacrum is improved. Among other things, blood circulation in the pelvic organs and peritoneum is stimulated.
Doing the splits is easier for children than for adults. However, safety during training and stretching is paramount. The best age to start training is from 4 to 7 years. During this period of a baby’s life, muscles have good flexibility and elasticity.
You need to train daily, for a minimum time of half an hour to an hour. If you start training your child every other day, this will only prolong the training and will not give the desired result.
It is impossible to do the splits with not warmed up muscles; you can injure the child. Intensive heating for at least a quarter of an hour. You can run, jump, squat, swing your legs.
There are two types of twine:
Performing longitudinal is much easier. This is what is chosen as the basis. The main rule for its implementation is the flexibility of the muscles under the knees.
- Perform exercises to stretch them as often and for as long as possible. The legs should be fully straightened without bending under the knees. The baby's tummy should be in full contact with his legs.
Performing a transverse one is more difficult. To perform it, the muscles must have good plasticity along the entire length of the leg. You can improve your flexibility by swinging and bending. And no less important is the correct execution. A technically correctly performed exercise will not cause discomfort or pain to the child.
- When stretching, you don’t need to force your baby to sit down right away.
- Slowness, smoothness, the key to success.
- Every day, increase the load, conquering the splits centimeter by centimeter.
- Explain to him that it shouldn’t be very painful. This is the only way he can overcome his fear.
- If he is very scared, his favorite cartoon or music can distract him during training.
Features of preparation:
1. Warm up, warm up the muscles.
2.Pumping muscles with swings. To perform this technique, you need to lean on the back of a chair. Raise your leg with your foot from the chair. Perform 10 movements for each leg.
3.Stretching the gluteal and knee muscles. To do this, place your feet wider than your shoulders and bend over, trying to reach the floor. These movements stretch the muscles of the entire leg. Perform 10 repetitions on each leg.
4. We get down on our knees. Gently spread the legs apart, repeating the frog squat. We try to lower the pelvis to the floor as much as possible. We went down and stayed for a couple of minutes. The muscles need to take position, relax, fixate. This is called muscle memory. You need to perform at least 10 repetitions.
5. The child sits on the floor. Places the legs for the twine, while pulling the arms forward. You need to reach for your hands, pressing your torso as close to the floor as possible. You need to perform 10 fixed repetitions.
6.The legs move apart when landing. The child needs to lie on the floor with all his weight, stretching the leg muscles. You need to perform three approaches of 3 minutes each with fixation of the position.
7. Sit down, bringing your feet together. Then we try to pull the heels as close to the pelvis as possible. In this position, you need to press your knees to the floor. You won't be able to do the exercise right away. Initially, the baby needs to pull the muscles himself, then parents should help. Perform 5 approaches with fixation of the position for three minutes.
The child must do the splits himself, do not put pressure on his shoulders. It coordinates stretching and controls pain. Each position should be fixed for a couple of seconds.
How to teach a child to do a cartwheel
Before you teach a child something new, you need to instill faith in him. He must be confident in his abilities, the support of his parents, and the safety net. It is very important to overcome fear; one should not be afraid of doing something wrong, and should not be upset at the first failures. Parents need to explain that not everything works out the first time, but he is strong, he will practice a little and everything will work out.
You should not start doing the wheel without preparation, warming up your muscles, and stretching. The specifics of stretching are described in the exercises above. You can add forward and backward bends to these, they coordinate movement and concentrate the child’s attention. A stand in a birch tree, abdominal pumping, push-ups, and a plank will not be amiss. The wheel is spun when the muscle frame is fully strengthened.
Features of execution:
- To perform the cartwheel, you need to stand on the floor. Spread your legs wide apart.
- The child should accelerate with his arms spread wide. Maximum two or three steps.
- One hand needs to be lowered to the floor, preferably the right one.
- A swing is performed from the left arm and leg. This movement pushes the body to turn over.
- With your right hand we move to the left. For a few seconds the child stands up.
- Then the tilt changes, the child first stands on the left leg, puts the right one behind it, and straightens the body.
The exercise is not recommended for children with poor coordination of movements, high or low blood pressure, heart disease, and those who often faint. Parents must initially calculate all the risks before starting the task.
Instructions:
- Well-developed shoulders are 90% of the key to success.
- Frequently standing in a birch tree trains coordination.
- After the birch tree, you can stand on your hands, pressing against the wall. This stance trains coordination of movements.
- Help your children, praise them for every achievement.
How to learn to stand on the bridge
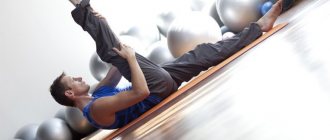
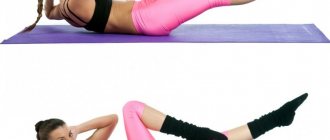
1. You need to do the following exercise: lie on your stomach, stretch your arms up. Now raise your arms and legs at the same time, bending your back. Make sure your knees and elbows are straight. Hold in this position for about a minute. Then lower yourself down and repeat a few more times.
2. Roll over onto your back, with your legs bent at the knees and your arms straight along your body. Raise your pelvis as high as possible, and then lower yourself onto your back. It is advisable to stay in an elevated position for at least 5 seconds.
3. Kneel so that your feet are shoulder-width apart. Now you need to smoothly bend back, reaching your heels with your hands. At the same time, keep your back extended and tilt your head slightly back.
4. While lying on your stomach, grab your ankles with your hands. Then lift your head, legs and chest at the same time to bend. Hold for a few seconds and lower yourself.
5. For the next exercise you will need a special gymnastic ball. If it is not there, you can skip this step. You need to lie with your back on the ball, place your feet shoulder-width apart. Lower your arms to the floor, bending, the ball will support you.
6. Lie on your stomach again, placing your arms approximately at hip level. Arch your back and at the same time bend your knees so that your toes touch your head. Hold this for a minute and then lower yourself down.
7. When you have warmed up and prepared your muscles well, try standing on the bridge from a lying position. To do this, you should lie on your back, bend your legs and arms, with your elbows pointing up. Then bend over, straighten your legs and arms, and try to stand on the bridge. Hold this for a couple of seconds, sway a little and return to the starting position. To make it more challenging, move your hands closer to your feet.
These exercises will help you strengthen your back muscles and prepare them for standing bridges. To speed up the results, do them several times a week, or better yet, every day. But just treat this process with all care and caution, and under no circumstances make sudden movements. All bending and bending should be done only smoothly and gradually.