Artistic painting of nails today is becoming more and more popular. Just recently we told you about the technique of painting nails at home, and described some patterns that even beginners can do. But we forgot to mention one thing: the technique of painting on nails that we talked about is not the only one available to a beginner. You can draw intricate and bizarre patterns on your nails without special preparation in another way. The name of this method is water or marble manicure.
The main advantages of water manicure
- This technique is possible even for an absolute beginner who has no idea how anything can be drawn on nails; whose hand trembles when trying to draw even the simplest drawing
- Performing a marble manicure requires very little time, and →
- The drawings turn out simply fabulous, no one will even think that you drew them yourself, without the help of an experienced and sophisticated manicurist
- You will not need any special devices, tools or ingredients - just like special preparation. The information that you will find in this article will be quite comprehensive and will answer all your questions, and will also help you cope with the most common problems and difficulties that arise when you first try to use the water manicure technique
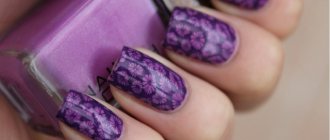
Water manicure is the easiest and most affordable way to decorate your nails with a masterpiece design, spending just five to ten minutes on it. And Lady Zaza magazine will tell you how to achieve such an incredible effect.
What you will need
If you decide to do a water manicure yourself for the first time, then be patient and also allocate about 2 hours of free time for this procedure. You should not think that this type of design will always be created in the same labor-intensive manner, because each time your skill will grow, and the time spent on manicure will decrease. If you find it difficult to understand the technique of such a manicure, then we suggest you use photo or video tutorials on how to create it.
In order to ideally create a water manicure at home, without resorting to the help of professionals, you need to stock up on the following set of devices and materials:
- a set of varnishes: white varnish and at least two liquid varnishes of different colors that combine with each other;
- base coat and fixer for manicure;
- a bowl filled with water (only water at comfortable room temperature will do);
- greasy hand and body cream, PVA glue or adhesive tape (fabric adhesive plaster);
- finely sharpened matches, an orange stick or toothpicks;
- cotton pads and several sticks;
- nail polish remover.
How to do water manicure at home
First, let's make a list of what we need to create a marble manicure:
- Varnish or special nail paints - at least three or four colors, more is possible, but not less
- Bowl of water at room temperature
- Long needle or thin toothpick
- Nail polish remover, cotton wool and cotton swabs
- Baby or other rich cream
Each of you can easily assemble such a simple set, right? It’s hard to believe that this will be enough to paint simply unimaginable patterns on your nails!
Well, we've given you a few minutes to prepare, now it's time to get started. We do not recommend following the scheme immediately: first familiarize yourself with the entire sequence of actions, understand and analyze the step, and only then try your hand. The main thing is to believe: you will definitely succeed!
Practical recommendations
- Choose a wide and tall bowl. Otherwise, there is a likely risk that you will touch the edges and start the procedure over again each time. It is also not uncommon for girls to hastily spill the contents onto their clothes.
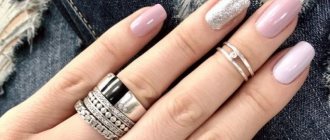
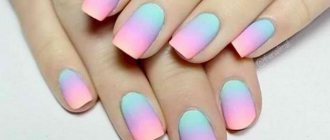
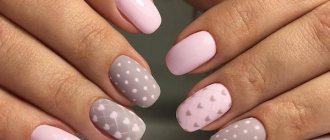
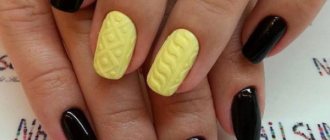
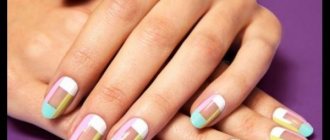
- In spring and summer, give preference to bright shades of the base for water manicure. It can be yellow, red, light green or blue. In winter and autumn, limit yourself to soft pastel colors, pink or white.
- When you run your finger through the water, be sure to pick up any remaining coating with a toothpick. This move will prevent the design from spreading and will make the contours of the flower/star clear and not blurry. In another version, the remains will lie on top of the main pattern and block it.
- Water manicure can also be performed on long nails. The technology looks beautiful if you lower only the free edge of the plate into the composition. To make the transition clear, stick French manicure strips on your nails and secure them with electrical tape or tape.
- Do not immerse your fingers in deep water, always protect your skin. To remove nail polish from the cuticle, use the tip of a toothpick, drawing it in a semicircle. You can also replace the toothpick with a glass nail file; its edge is not sharp and has a suitable width.
- To prevent the polish from spreading on the treated nail, carry out the procedure one by one. First, lower the first finger, collect the excess, clean it and leave it horizontally until completely dry. Only then proceed to manicure the remaining nails.
- If you are left-handed, start the procedure with your right hand. If you're right-handed, use your left. This especially applies to girls who have no experience in nail design.
- Do not overdo it with soaking the varnish in water. You need to prepare the composition for no longer than 1.5 minutes, after this time the colors begin to mix and the pattern becomes blurred. Try to quickly drip the composition and draw a pattern on it.
- For water manicure, only liquid varnishes are used, which spread in a short time. If for some reason you have thick ones, add 4-6 drops of nail polish remover to the water. You can also pour it into the bottle with the base itself, but in this case you risk ruining the varnish.
- Give preference only to the professional series of products. As a rule, their consistency is uniform; similar varnishes match each other in terms of chemical characteristics and last longer on the nails.
- Pour only water at room temperature into the container. If the liquid is too cold, the varnish in it will not spread, and if it is hot, it will curdle.
- Ladies who prefer shellac to regular varnishes are not prohibited from using it in water manicure. To do this, first degrease the plate and cover it with base under the main surface. At the end of the procedure, dry the drawing in a UV lamp until completely dry.
Prepare the necessary tools and materials. Always clean the toothpick after drawing lines to avoid color mixing. Do not delay in preparing the composition, otherwise the drawing will be blurry. Start treatment with the little finger, gradually moving to the rest of the nails.
how to properly grow nails at home
Marble manicure technique at home
- Get a hygienic manicure - remove old polish, give your nails the desired shape, remove cuticles. We paid special attention to the technique of trimmed manicure in the article “Manicure with water”, where you will learn a lot of useful information on this topic.
- Prepare all the necessary tools described in the previous paragraph. It will be inconvenient for you to run around and look for something missing when you start applying a water manicure, so make sure that you don’t have to do this in advance.
- Cover your nails with a layer of white or other light-colored varnish, which will be the main one in your manicure. For the first experiment, white varnish is most suitable, then you can try other options.
- Fill a bowl with warm water (room temperature).
- Place one or two drops of a solid color polish into the center of the bowl.
- Along the edges of the first spot, add one or two drops of varnishes of other colors that will participate in creating the composition.
- Mix the varnishes with a toothpick or a needle so that fancy thin stains are formed. You can try to depict a different pattern in mind, but again, we do not recommend going too far in your experiments for the first time. First, as they say, you need to “get your hands on it,” feel the technique - and then try to bring something of your own to it.
- Lubricate the skin around the nail with a rich cream. You can often find a recommendation to wrap your finger with tape or adhesive tape. We won’t say that this advice is bad, but a rich cream works just as well, if not better - all you have to do is wash your hands so that not a single trace of nail polish remains on your hands.
- Dip your finger into the water under the stain. It is best to start diving from the very edge of the bowl, lowering your finger almost parallel to the water - so that the varnish stain does not smudge.
- Then slowly lift your finger to the surface of the water so that the polish stain is located directly on the nail.
- Remove your finger from the bowl and repeat the process with the rest of your nails.
If you have a large enough container that will allow you to paint all your nails at once, stretch the stain of varnish so that you can manicure your entire hand in one motion. The result will be even more impressive, as the pattern will be more intricate. At the same time, you will spend five times less time on the entire procedure!
Main stages of work
To perform a water manicure at home, you first need to get your hands in order: remove the cuticles, shape your nails with a nail file. It doesn’t matter which method will be used - classic edged, European unedged or gentle Brazilian. The main thing is that your hands look perfect. Polishing the nails before coating is mandatory: the varnish will only adhere well to a flat surface.
Before doing a manicure on water, you need to prepare: cover your nails with a base or varnish that will act as a base. Then apply strips of paper tape to the skin as close to the nail as possible to protect it from staining. Instead of tape, you can use a thick cream to protect the skin.
Now it's time to start creating a drawing on the water.
- Pour water at room temperature into a wide and deep enough plate so that you can immerse your finger at least halfway in it. The water must be absolutely clean, without air bubbles.
- Prepare varnishes. For the first time, you can try to make a stylish water manicure using just two colors. In the future, having mastered the technology, you can make multi-color complex compositions.
- Bring the varnish brush of the first color close to the surface of the water. A drop of varnish should fall into the water. While the varnish has not hardened, drop a second color of varnish into the center of the resulting stain. Repeat mixing in the center of the varnish spot six or eight more times. The circles should spread across the surface of the water quite widely. Everything needs to be done quickly, otherwise the pattern on the water will lose its elasticity and harden.
- Using a toothpick or brush, draw fantasy patterns on the surface of the varnish circles. You should not immerse the tip of the selected tool deeply; it will simply slide along the colored water. If paint sticks to the tip, you need to remove it with a cotton pad.
- You need to make a drawing creatively, imaginatively, but quite quickly. After a minute, the varnish will begin to harden, so no more than sixty seconds should pass from the first drop to applying the design to the nails.
Secret tactics for water manicure
Although the procedure for applying water manicure is incredibly simple, many ladies encounter certain difficulties - and not only the first time, but also subsequent times. As a result, they decide that they are unable to overcome the difficulties and abandon the idea forever.
Lady Zaza magazine sincerely wants its readers to be able to use this excellent manicure technique without any problems, so we have done a lot of work especially for you: we have identified the most difficult moments that you may encounter and asked our experts how to solve them.
We present to your attention→
A Guide to Overcoming the Challenges of Marble Manicures
The drawing on the water turns out very beautiful, but on the nails it appears as a blurry spot of an unknown color.
Options to solve the problem:
- Water too cold or too hot. It should be at room temperature, which is quite easy to check: when you immerse your finger, you practically do not feel the water.
- The varnishes didn't mix well. You need to stretch them quite carefully.
Varnishes do not mix well, it is impossible to draw a design on water
Most likely, the varnish is either too thick or too old. To prevent this problem, you need to:
- Or use a varnish that does not contain acetone at all
- Or add a couple of drops of acetone to the water so that the varnish dissolves and mixes better
The design does not stick well to the nail
Perhaps a greasy cream got on the nail, so the design is slipping. If this is not the problem, most likely the water is too hot. Its temperature should be at room temperature, otherwise the varnish dries too quickly
The pattern forms on the water, but as soon as I dip my nails into the bowl, it smears
Before dipping your nails, you need to wait until the design is slightly fixed and crusted over. It will take about 10 seconds
The drawing lies crookedly, unevenly, leaving unpainted areas
The problem is most likely in the varnish (it is either too thick or fast-drying) or in the water temperature (we wrote about this above). Try to cover the nail before applying the design with one or two layers of white or other light-colored varnish, so the stains and gaps will be invisible, and the design, on the contrary, will look quite elegant and sophisticated.
Execution technique
The drawing will turn out very beautiful and harmonious if you follow a simple sequence:
- Prepare your nail plates well, degrease them with nail polish remover. Remove the cuticles and give your nails the shape you like. Apply base coat.
- Fill your container with warm water to the brim.
- Cover the entire area around and underneath the nail with oil. Make sure that greasy particles do not get on the nail.
- Drop a drop of varnish onto the surface of the water; it will turn into a puddle in 1-2 seconds. Take another shade and drop it into the center of the previous stain. Then apply the previous varnish again in the center. You can make such a target depending on your taste. The more alternations of colors, the more elements there will be in the drawing. Apply drops at a distance of 3-4 millimeters from the surface of the water, otherwise they may sink to the bottom.
- Using a toothpick or a needle, adjust the pattern, forming streaks, as is done in a cup of cappuccino.
- Dip your finger quickly but gently into the water, nail side down. Use a toothpick to move away any unnecessary fragments and remove your finger.
- Once dry, very carefully remove excess polish from your finger using a polish remover.
- Cover the design with clear varnish or a special fixative.
- Enjoy the beauty of your nails and feel proud of yourself.
Water manicure: video examples
To make the essence of the tactics clearer to you, we offer you several videos describing the most interesting marble manicure techniques:
https://www.youtube.com/watch?v=4-Fy2zA6B7Q
https://www.youtube.com/watch?v=JsEmuYZE4w8
Now that you have such a detailed guide to action, you can easily decorate your nails using the water manicure technique. And if you have any difficulties, contact us, we will find answers to all your questions.
Sasha Pavlova specially for lady-zaza.ru
Possible mistakes when creating a manicure using water
Step-by-step instructions for a bright manicure
If something doesn’t work out, it’s possible that the procedure technology was not followed correctly. Common mistakes:
- The container is too small or the liquid temperature is incorrect.
- Using a toothpick without cleaning it and not replacing a toothpick that is cracked or overly soiled.
- Hardened varnish. If it is too viscous, you need to use a special product.
- Incomplete removal of excess varnish after dipping your finger into the water.
Ideas for water manicure
To make a beautiful manicure using water, you need to prepare all the necessary materials, select the optimal shade of varnish in terms of color, and follow the technology for carrying out the procedure. If all conditions are met, you will get a unique design on each nail. This manicure looks great on any nails. Creates excellent nail art for both long and short nails.