The technology is quite simple
To soften the cuticle, special formulations of oils and various emulsions are used. The cuticle is moved with a natural orange stick without damaging either the skin or the nail plate. The surface of the nails must be sanded. After the procedure, the skin of the hands is treated with moisturizing cream.
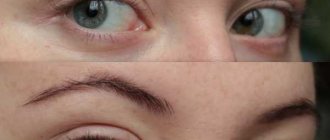
Unedged manicure is of greatest interest to those with very thin, delicate skin, when the blood vessels are located close to the surface of the epidermis. Such skin, even with minimal damage from tweezers, is prone to heavy bleeding, which makes the classic version of manicure undesirable or difficult.
The technology for performing this type of manicure does not require any special skills or tools. That is why the popular European manicure at home is very easy to do. Numerous photos prove the excellent results of this simple procedure.
Dry manicure
You can read a lot about this new product in different sources, and you can also see its implementation in the video at the end of the article.
In general, this is a variant of the European unedged manicure, which appeared at the very beginning of the twentieth century. This simple nail care was introduced into fashion by the French woman Juliette Marlene. This method is ideal for people with delicate, thin skin whose blood vessels are located close to the surface. With this treatment of nails there is no risk of serious infection. Therefore, probably, this version of manicure remains quite popular today in Western countries, but edged manicure is becoming very rare there. The main difference and advantage of a bloodless manicure is that the cuticle is not steamed or cut when performing it. This manicure does not require any water procedures, however, according to the technology of a particular master, the skin of the hands can be steamed in a warm bath at the end of the procedure.
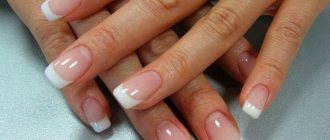
Unedged manicure helps keep your hands in perfect shape.
You can’t count on quick results after the first dry manicure session. If it has not been performed before, then the impeccable condition of the nails can only be achieved in the 7-8th session. Often, to speed up the process, specialists can combine both methods: predominantly using a solvent and a nail file, and removing hangnails with forceps.
The advantage of an unedged manicure is that it eliminates the possibility of injury to the skin of the hands with a cutting instrument, and, consequently, the risk of infection. A dry manicure does not subject the nail to temporary deformation, which is why the polish stays on it much longer and the nails themselves remain fresh longer.
European dry manicure
performed with the following tools:
- file;
- orange sticks for tightening cuticles;
- nail polish remover;
- cotton or gauze swabs;
- cuticle softening cream (preferably with lactic or fruit acids);
- cosmetics that can inhibit the growth of cuticle skin;
- nail polishes;
- nourishing and moisturizing hand creams.
On topic: Japanese manicure
Orange sticks
Cuticle remover cream
File
Nail and cuticle oil
Hand cream
Nail polish
European manicure is ready
Manicure procedure
- Remains of old varnish are removed.
- Nails are filed and given the desired shape.
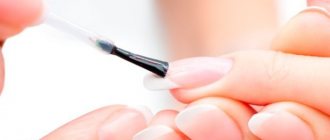
- The skin around the nail is lubricated with a special product containing natural fruit or lactic acids. They are designed to gradually dissolve the keratin on the stratum corneum, which makes up the outer layer of the skin. Moreover, it not only softens the surface layer of the skin, but also prevents further growth of the cuticle.
- After 5-7 minutes, remove the softened skin using a soft orange stick. Next, you need to lubricate the skin around the nails with special oils, which soften it and make it much more elastic, preventing the appearance of cracks and hangnails.
- The nail plate is polished and varnished.
- Special oils are applied that can slow down the growth of cuticle skin.
- The procedure ends with a hand massage with nourishing oils.
Orange sticks are an indispensable thing in unedged manicure
However, it is worth noting that this manicure is not suitable for everyone. If you do not take proper care of your nails before performing a new type of manicure, the dry method will not save the condition of your hands, or rather, such care will be of very little use. This method is very gentle and delicate, and therefore is suitable only for those who thoroughly take care of their hands in general and manicure in particular. It is more appropriate for simply keeping your nails in order.
Before doing a dry manicure , you should understand its properties. Preparative manicure, as the untrimmed method of nail care is otherwise called, will not have any effect on the skin without various products: creams, lotions with fruit acids in the composition of the products. These natural acids, without water, soften the cuticle and inhibit its growth. Due to the fact that manicure does not require exposure to water, this method got its name - “dry”. Also, this manicure does not require scissors or other cutting tools. The cuticle can be easily removed with a pumice stone or a soft stick. The nail plates are filed and polished with different-sized files. This manicure does not cause pain. Oils and creams stay on the cuticle for only a few minutes, but the manicure itself is completed in just half an hour.
On the subject: How to strengthen nails at home
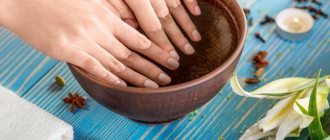
To maintain results, it is recommended to regularly take nail oil baths.
In addition to all other advantages, an unedged manicure makes the varnish coating more durable, while the “wet” method leads to deformation of the nails under the influence of moisture. The nail first swells, becomes very smooth, after which it dries out and again acquires an uneven texture. For this reason, varnish applied to a “wet” manicure does not last very long. But after the unedged method, such an effect is absolutely excluded, which is a significant advantage of such a manicure. Without moisture, the nail does not become deformed, which is why the polish is applied smoother and easier, and lasts longer.
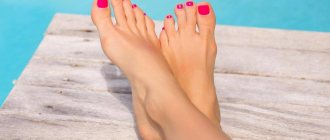
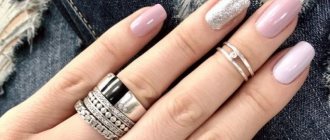
After such a manicure, bright polish lasts longer.
Advantages and disadvantages
- Unedged manicure has many fans. However, many do not consider this method acceptable for themselves. Advantages of the method:
- no risk of infection through superficial skin lesions;
- complete painlessness;
- no risk of injury;
- beneficial effects on the skin;
- effective for people with thin skin and nearby blood vessels;
- long-lasting effect with regular care;
- slowing down or stopping the growth of the cuticle.
The essence of unedged manicure
Unedged (European) manicure is the safest procedure of all. In general, it is not much different from the edged one. The main feature is that the cuticle in this case is not cut, but is moved using a special stick after preliminary softening. This is precisely the advantage of such a manicure, and its disadvantage.
Otherwise, the European version of nail treatment has a standard set of operations, such as filing, grinding, and varnishing. Sometimes a hand bath is used, but you can do without it.
Benefits of European manicure
Unedged manicure is the safest. His procedure does not involve the use of forceps and other instruments that can injure the skin. This saves not only from discomfort, pain, bleeding, but also from the appearance of hangnails.
The procedure is absolutely painless.
It is easy to carry out at home if you have a certain set of tools and cosmetics. If you skip the bath, you can achieve longer retention of nail polish. safe and painless nail care method
Disadvantages of unedged manicure
The main disadvantage of European manicure is that it sometimes takes several months to completely switch to it. Things are especially difficult in cases where there is a dense, hard cuticle. After the first procedures, hangnails may appear. But gradually the situation will return to normal and you will be able to easily and painlessly take care of your nails, quickly putting them in perfect order.
Who is suitable for unedged manicure?
Having found out what an unedged manicure is, it’s easy to understand who it is most suitable for. Of course, those whose skin is thin and delicate, with capillaries located close to the surface. In this case, careful, delicate care is required. Trimmed manicure is simply contraindicated here.
But even if your skin is not too thin, you can try this method of nail care for yourself.
Just keep in mind that it will take some time to fully transition to a European manicure. To begin with, it is better to contact an experienced specialist, and gradually, if you wish, you can begin to carry out the procedures at home yourself. allows you to have beautiful hands and perfect nails
Cuticle treatment methods
An unedged manicure at home can be done in three different ways:
- dry;
- wet;
- hot.
To perform a dry manicure, you do not need to pre-soak the skin. A special emollient is applied to dry skin of the hands. This method is not suitable for brittle, injured nails that need additional hydration and a delicate approach. But dry unedged manicure lasts much longer.
The wet method involves soaking the skin in water for several minutes before treating the cuticle. The bath is often filled with water and oils or special lotions.
The hot method is recommended for dry, brittle nails and damaged cuticles. Hands should be steamed in hot cream or lotion, heated to at least fifty degrees.
How to do it right
Doing a dry manicure at home is not at all difficult. But experts advise first going to a salon and getting a professional trimmed manicure. Only after this the unedged method will effectively maintain the condition of the hands. But at the same time, it should not become a one-time event dedicated to an important event, but a permanent procedure, otherwise there will be no benefit from it.
For the first time, it is better to get such a manicure in a salon.
At the very beginning, you need to make preliminary preparations.
- To remove hangnails, you need to prepare nail clippers. But not the old rusty ones, but sharp and high-quality ones, so as not to spoil the nails themselves and the skin that makes up the periungual bed.
- You will need two nail files, with a thick and a thin abrasive material. A thick nail file is needed to create the basic shape, and a thin nail file is needed to finish the final sanding of the edges.
- You will also need an orange stick or simply a metal spatula from a manicure set. These tools will be used to process the cuticle.
- You need to prepare cotton pads and soft cellulose napkins for work.
- You can’t do without a nail polish remover. Experts recommend giving preference to products that contain extracts and oils that facilitate additional nail care. You can also use napkins with special impregnation. For fragile and weakened nails, you need to choose a product that contains moisturizing and nourishing components.
Related: Colored mascaras
As for cosmetic preparations, you should have a special set for dry manicure
.
- For unedged manicure, you need to use special preparations to remove the cuticle. In addition to the previously mentioned fruit acids, they also contain aloe extract, vitamins and additives that have a mild peeling effect. This will give a triple result: softened cuticles, their removal and growth inhibition. If the cuticle does not come off on its own, it can be removed with a stick or spatula. It is especially convenient to use the product in the form of a felt-tip pen, which can simultaneously soften and push back the cuticle.
- Base varnish or base is a transparent liquid with a pinkish tint. This product is needed if a richly dark varnish is applied. It will protect the nail plate from the aggressive colored pigment contained in the varnish and causes yellowing of the nail over time (this could be observed by everyone who used varnishes). A base containing vitamins, calcium or proteins is especially useful.
- Safe nail polishes.
- A scratch-resistant fixing varnish that can protect the nail plate from other mechanical damage and make the color of the varnish richer.
- A pencil with corrective properties for eliminating blemishes, the core of which is impregnated with nail polish remover. This is a useful thing, but can be replaced with a simple cotton swab, pre-soaked in nail polish remover.
After preparing cosmetics, spatulas, files for dry manicure
and other tools, you can begin to perform the manicure itself.
First, the nails are prepared: a day before the procedure, the remnants of the old varnish are removed, which will allow the nails to rest and breathe a little.
The nails are given the required shape, and first it is straightened: a rectangular shape is easier to process, and the nail plates are also less damaged. Nippers and a thick file are suitable for this work.
Using a smaller file, the nails are completely formed. If, after running along the edge of each nail with your fingertips, the edges are smooth, the files can be put aside.
The felt-tip corrector can easily be replaced with a brush dipped in nail polish remover
After these steps, you can begin removing the cuticle. A cuticle softener is applied: the thin skin of the nails is covered with liquid for 5-7 minutes. Then, using the blunt edge of a wooden stick or spatula, the cuticle is carefully lifted and carefully moved to the edge of the periungual bed. Then the product is finally removed and the remaining skin on the nail is removed with the sharp edge of the stick. The nail plates are thoroughly cleaned of the remaining drug with a cotton swab dipped in milk or lotion.
The base is applied to the nails: a drop of it is placed in the middle of the nail and evenly distributed with a brush over its entire surface. After the base has dried, decorative varnish is applied.
So, let's look at all the stages of European unedged manicure at home:
- The first thing you need to do before starting work is to treat your hands with an antiseptic.
If not, wash your hands with soap and dry thoroughly. - The second stage is to give the nails the desired shape.
When filing nails, make sure that the movements are in one direction: from the edge to the center of the nail, since when working with a file “back and forth”, the nail plate is injured, which will lead to inevitable delamination. - At the third stage, using a cuticle remover, we soften the skin around the nail plate.
To do this, carefully apply the remover to the cuticle and side ridges - and wait 2 minutes for the product to take effect. After this, it’s time for the main stage. - Fourth stage.
Using an orange stick, first carefully push back the cuticle, and then slowly, carefully, clean it from the center to the edge of the nail, not forgetting about the side ridges. Movements should be light, without strong pressure, to avoid injury to the nail plate. Don't forget that the orange stick is an individual tool, no one else should use it except you! After you have treated the cuticle, the remover must be washed off. - The fifth stage is polishing the nails.
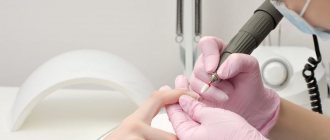
You need to start polishing from the hardest part of the file; it removes all the unevenness from the nail. The other sides smooth the surface of the nail and add shine. This stage is not mandatory, but without it you cannot achieve perfectly well-groomed nails. Experts recommend using a polishing file no more than once every three weeks. - After completing all the above steps, the last and most important step is to apply caring oil
. And there is one secret: after you have applied the oil to the nail and the skin around it, do not rub it in with your fingers, as most of the oil will be absorbed into your fingertips. Just leave it to soak. After some time, your nails and skin will absorb as much oil as they need, and remove the excess with a cotton pad or napkin.
The transition from edged manicure to unedged manicure will take about a month:
- The first thing you need is to do a good, high-quality trimmed manicure for the last time
, and then forget about your scissors and tweezers. - The second thing is to be patient
! After the last time you do a regular manicure, the cuticle will begin to grow mercilessly and will look unaesthetic. During this period, it is extremely important to constantly use rich hand creams, as well as purchase cuticle oil - and rub it in twice a day. - And of course, regularly carry out the
unedged manicure procedure.
The process of switching from one type of manicure to another may seem long to you - but it's worth it!