history of the holiday
The holiday is very unusual in terms of its appearance. This holiday is now a mixture of cultural traditions and beliefs of the Celts and Romans, and Christianity has added its own specifics. The Celts left behind the date of the holiday - October 31st. The ancient Celtic people worshiped the forces of nature. The Celtic priests, the Druids, divided the year into two halves - winter and summer. The night from October 31 to November 1 was considered the transition from summer to winter, and it was on this day that the gates of the other world opened. In honor of this, the Samhain festival was held, an obligatory part of which was making sacrifices to the spirits of dark forces.
When the warlike Romans conquered the Celtic lands and brought their traditions, it turned out that they themselves had a holiday, which was also celebrated on the night of October 31 to November 1. This holiday was in honor of the goddess of plants - Pomona. Thus, thanks to a fortunate coincidence, the Celtic and Roman holidays came together. It should be noted here that this was facilitated by the fact that both of them celebrated the day of the dead that night.
The arrival of Christianity brought its own additions. In order not to destroy established traditions and firmly consolidate the Christian faith, Pope Gregory III decided to celebrate All Saints' Day not on May 13, but on November 1. This is a brief history of Halloween, which, having undergone several metamorphoses in different eras, became known as the holiday Halloween - All Saints' Day, when all kinds of evil spirits come out of the other world, and restless souls can come to any home.
Halloween Traditions
The celebration of Halloween is a fun mixture of pagan and Christian traditions. Pagan festivals manifest themselves in our time in the tradition of dressing up in costumes and transforming into a variety of evil spirits, witches, sorcerers, dead people, ghosts. There is a huge scope for creativity - you need to work hard on the costume in advance. In addition, adults and children come up with ways to scare each other more and develop interesting attractions.
Even on this day, adults and children, dressed in costumes, go from house to house begging for sweets. This custom is called “Treat or it will be worse.” This holiday is also famous for its various fortune telling.
Halloween gives you the opportunity to use your creativity by creating Halloween crafts with your kids. And to make the holiday unforgettably interesting, you can organize a party with friends. To do this, you need to decorate your home by purchasing or making various Halloween accessories yourself.
Design nuances
It is important to constantly remember some nuances when designing crafts:
- Pumpkin will remain fresh for a very long time if you put it in water for several hours before using it.
- Properly peeled pumpkin lasts no more than 5 days. Therefore, it is necessary to build a lantern the day before the start of the celebration.
- Painted patterns will last longer if they are lubricated along the contour with Vaseline or vegetable oil.
- It is imperative to make holes in the lid of the fruit so that the flow of hot air can escape outside and not fry the vegetable from the inside.
- Before use, the candle is placed in the freezer for about 3-4 hours. This way, the lantern will burn longer.
- And in order for the Jack Lantern to not only burn during Halloween, but also exude fragrance, then you need to treat it from the inside with cinnamon or nutmeg.
By putting this knowledge into practice, you will be able to create the perfect scary figure that will look enchanting at night. It is advisable to learn more about the different product options in order to choose the most suitable one for yourself.
Crafts for the holiday
There are many interesting crafts you can make for Halloween. For example, you can make lanterns from glass jars. To do this, you should cover the jars with colored translucent or plain paper, draw or cut out scary faces on it and place a candle inside to create a special atmosphere of an open fire.
Ghost garlands made of paper or balloons with a ghost drawn on them with felt-tip pens also look very funny. Spiders and pumpkins sewn from fabric and hung on the walls will look very scary. You can also decorate the windows by gluing images of ghosts and paper pumpkins onto the glass.
But the most important accessory will be, of course, a real Halloween pumpkin. And if the problem of how to make a pumpkin for Halloween, how to carve a pumpkin for Halloween is not worthwhile in Western countries, then in Russia it is quite relevant.
Manufacturing options
There are many different options for making homemade pumpkin decorations for Halloween. If you don’t have a fresh pumpkin nearby, it doesn’t matter. An original beautiful mini pumpkin can easily be made from paper. Moreover, it is suitable not only for home decoration, but also as a gift for guests.
You will need the following tools:
- Colored sheets: green, black, orange.
- Scissors.
- Needle.
- Threads.
- Pencil.
- Ruler.
- Glue.
After making sure that all the components are at hand, you can get to work:
- Using a pencil and a ruler, divide the orange sheet into thin strips, no more than 2 cm in width and 16 cm in length. Then cut everything out with scissors. And to make the product not quite ordinary, you can take a special object with embossed edges. One craft will require up to 20 ribbons.
- All strips should be placed on top of each other and pierced at the top with a needle and thread. In this case, be sure to retreat 1 cm from the edge. The thread is fixed so that the opposite sides form an arc. Everything is secured with a knot.
- Straighten the resulting arc, and the strips should become so as to form a ball.
- Black paper goes over the eyes, nose and mouth. The first ones are made into a triangle, but the mouth is made into a strip with small teeth, and then glued onto a ball.
- A circle with wavy edges is cut out of green paper and glued on top.
- A cord is tied to the thread and a loop is made, which will be needed to hang the decoration.
- You can add a decorative mustache. A thin ribbon is wound around the blade of the scissors and pulled lightly. All is ready.
- The craft can be attached to a pre-selected place.
In addition to paper, you can take cardboard. Moreover, in this situation it will last much longer. If necessary, even felt is worth trying.
Papier-mâché vampire
For production you will need:
- jigsaw for neatly cutting holes;
- two pins with large heads;
- plastic jaw.
The traditional jack-o'-lantern face looks scary and intimidating, especially to a small child. However, if you want to celebrate Halloween at home without scaring him, then you can make a craft that is colorful and at the same time kind. For example, from papier-mâché.
Preparing for work - collecting the necessary components:
- balloon;
- rope;
- paper;
- salt;
- water;
- decor;
- primer;
- scissors;
- paints;
- flour;
Having collected the funds for production, you can proceed to creating a pumpkin:
- Inflate the balloon, but not too much.
- Sections are formed with twine. Gently pull the ends together, giving the composition a round, oval, oblong or elongated shape.
- A paste is prepared from flour and water. You need to take everything in equal proportions. Salt is also added there. Everything gets mixed up.
- Cut paper or newspapers into strips: 20 cm long and 2 cm wide.
- Cover the ball with a good layer of paste, onto which strips are applied, preferably overlapping. Allow time to dry - the paper will become hard and light.
- Coat the dry workpiece with a primer. And dry again.
- The ball is pierced and carefully removed. The paper demon is ready, it looks unusually attractive.
As soon as the blanks have dried, you can start painting them. If desired, you can decorate everything with small rhinestones.
Corrugated pumpkin
Also for Halloween, you can easily prepare, and on your own, a voluminous pumpkin made of corrugated cardboard. To do this you will need 7 sheets of orange paper, 2 sheets of black, unnecessary newspapers, glue, scissors, compasses, ribbons of different colors, pencil, corrugated cardboard, acorns, decorative pears.
It is necessary to crumple the paper and newspapers well so that they are more flexible. The sheet is placed horizontally, and crumpled newspapers are placed in the center, and everything is twisted so that it turns out to be a kind of candy.
You can make a cylinder out of corrugated cardboard and paste it on the sides with prepared candies. The tails are wrapped inward. Then the bottom is made of cardboard, covered with orange paper. Then cut out the base for the hat from black paper. A little crumpled newspaper is glued to its center. And then from the remains they roll up a small “bag for seeds”, which is attached to the base with glue. The hat is ready and can be placed on the pumpkin.
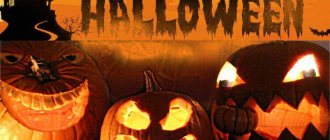
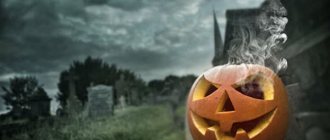
Jack-o'-lantern
Halloween pumpkin is also called Jack-O-Lantern. It is believed that if there is a pumpkin with a face carved into it and a candle inside near a house, then Jack will not enter such a house and will not bring trouble. Stingy Jack is a character from an ancient legend. Stingy Jack did not deserve heaven for his unrighteous life, and for deceiving the devil, he was not allowed into hell. He is forced to wander between worlds, useless and doomed, lighting his path with a jack-o'-lantern with a coal inside. Only for one night he comes down to earth and can do some nasty things to someone.
So, those who are afraid of Stingy Jack or simply want to create a holiday atmosphere simply need to know how to make a pumpkin for Halloween. It is best to entrust this event to children - they will be delighted!
First of all, you should give the children a task - to draw the most sinister, scary, vengeful face on a piece of paper. While they are painting, start looking for pumpkins. It is best to buy several of them in order to find a use for all the faces that will be drawn by children. Pumpkins should be large and strong enough; ideally, if the pumpkin is tall, a larger candle will fit.
Lamp manufacturing stages:
- prepare sharp knives, you can use wood carving tools and tablespoons;
- choose the drawings you like from those made by the children and apply them to the pumpkins: if the drawings are smaller or larger, redraw them on sheets of paper suitable for the size of the fruit;
- cut out templates from ready-made drawings;
- take care of the pumpkins: cut out the “lid” on top and carefully remove the pulp from the pumpkin using spoons;
- when the pumpkin is completely ready, attach the template to it and trace all the lines of the design with a marker;
- Using a small sharp knife or cutter, cut out a design on the pumpkin, do it very carefully;
- When the design on the pumpkin is cut out, the final chord remains - insert a candle and close the pumpkin with a lid.
Place your lanterns in the yard, light some candles and welcome your guests. And your holiday will be no less bright and solemn, no worse than that of the ancient Celts!
Video on how to make a pumpkin from balloons for Halloween / Pumpkin of balloons for Halloween
Making a scary face
Making a glowing pumpkin head is easy. You only need a few available materials:
- candle;
- cutting board;
- two knives: long and short;
- spoon;
- markers;
- special stencils;
- pumpkin.
The main “ingredient” of Halloween must meet some important conditions:
- You need a fresh pumpkin with a not very hard skin, on which you can easily cut out any pictures. The butternut variety is best suited, since it is not too large in size, and therefore ideal for all kinds of metamorphoses.
- The purpose of the vegetable is to delight not only during the celebration, but also afterwards. Therefore, you need to try to maintain freshness for as long as possible. Therefore, it is recommended to conduct a thorough inspection for damage and rot. Shape and size do not matter.
Then proceed with step-by-step actions:
- The surface of the table is covered with paper or oilcloth so as not to contaminate it.
- Only the highest quality pumpkin is selected, on the top of which a square or circle is drawn with a marker where the future hole will be.
- The designated hat is cut out step by step. Everything is done at a slight angle so that you can then cover it with the cut off top, like a regular lid.
- Carefully cut the workpiece - clean out the pulp and any seeds. Moreover, the wall thickness should reach approximately 3 cm. Processing of the workpiece should be as careful as possible.
- With a marker, triangular eyes and a nose are drawn, a mouth with an evil crescent smile with side fangs. Now the face is completely ready. Everything is done as large and noticeably as possible, otherwise it will be difficult to cut out.
- If there is a special stencil with any interesting design, then it should be secured to the pumpkin with tape or glue. And then use dotted lines to transfer all this onto the surface itself. At this time, you can use not only a knife, but also a thin awl or needle. The template is subsequently removed. Some masters work without them, showing a real master class. However, it is better not to take risks so as not to spoil the work.
- A thin, sharp knife should be drawn along the contour. Moreover, you should cut carefully and not too quickly.
- The pieces need to be pushed inward or pulled forward. And in order for everything to be smooth, all protruding pulp must be scraped off. Instead of a knife, you can use tools that are specifically made for peeling and cutting vegetables.
- You need to install a candle in the cavity and secure it so that it does not fall and spoil anything. A lid is placed on top.
- Instead of a candlestick, you can also install a jar of flowers. And put a light or a working flashlight around it.
The main work is done. You can move on to small details.