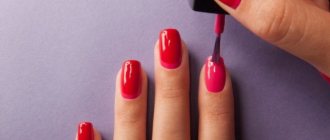
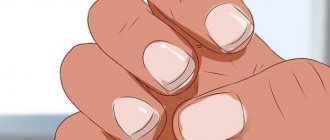
Gel polish is also called shellac and is also a long-lasting coating for nails. Its application requires unique skills and equipment, so the process is usually carried out in specialized salons. You can remove the resulting coating both in a manicure salon and at home, if you choose the right method and prepare high-quality tools and materials.
Material characteristics
The main properties of gel polish coating include:
- safety due to the use of hypoallergenic components, therefore the composition does not contain various toxins or other harmful additives;
- durability of the coating, since the gel hardens when using ultraviolet radiation, so it does not collapse and does not change its properties for three weeks;
- resistance to damage or tarnishing, even if a woman is constantly cleaning and cooking;
- ease of application, as well as quick drying under the influence of ultraviolet light.
If shellac is applied incorrectly, chips and cracks appear a few days after the procedure.
In order for the coating to have all the necessary positive parameters, it is important to choose a specialist who uses high-quality components and equipment. The process of applying gel polish is divided into stages:
- first, a hygienic manicure is done to give the nails the desired shape;
- the plate is polished with a buff;
- a degreaser is applied;
- the nails are coated with a primer to eliminate defects or irregularities, and it is advisable to dry the product using an ultraviolet lamp;
- creating the first layer of gel polish, which requires polymerization under ultraviolet light;
- fixing the coating with a second layer;
- Any sticky residue that appears is removed with a degreaser.
Following the technology ensures the creation of a strong and reliable coating, and also does not cause any harm to the nail plate.
It is forbidden to rip off the coating or remove it by other mechanical means, as this leads to damage to the nail, so special liquids and suitable equipment are used.
How to remove gel polish
Removal of shellac coating can be done in a salon or independently. Each option has both pros and cons.
| Removal methods | Advantages | Flaws |
| Visit to the salon | — prompt removal of the coating; — use of modern equipment; - professional work; - protection against damage to the nail plate. | — high cost of services; — a mistake on the part of beginners is possible. |
| Executing the process yourself | - saving money; — acquiring new skills and abilities. | — beginners spend a lot of time on the process; — you need to buy equipment and fluids; — there is a possibility of harming the nail plate; - it is difficult to perform the process with one hand. |
If you decide to do the work yourself, it is recommended to buy only professional equipment and tools
At the master's or in the salon
Usually girls prefer to get their nails done and remove old coatings only in salons. This method has many advantages, but it is important to choose a professional technician.
To remove gel polish, use a remover, machine, steamer, milling cutter or impregnated wipes.
Remover
It is presented as a universal product sold in beauty salons. It is designed to remove shellac coating, but it will take about 30 minutes. This procedure is often offered in salons, for which the master performs the following steps:
- the skin near the nails is lubricated with cream;
- cotton wool is moistened with a revumer and placed on the nails;
- to prevent the liquid from evaporating, wrap your fingers in foil;
- after 15 minutes the cotton wool is removed;
- the remains are removed with a wooden stick.
If it was not possible to obtain the desired result at one time, the procedure is repeated.
Impregnated napkins
They are presented as a proven, convenient and effective means for removing old coating. Used both at home and by craftsmen. For the job, you buy special napkins with suitable impregnation, a sander, a spatula and nail oil.
Initially, the nails are treated with an abrasive stick. Next, the finger is wrapped in a napkin, and it is important to ensure that the napkin completely covers the nail. The napkin is fixed with adhesive tape, after which you need to wait 15 minutes. After this procedure, the gel polish comes off easily from the nails, but any solid residues are removed with a spatula.
The advantages of this method include safety and versatility, since napkins can be used several times and no unique skills are required. You don't need to use foil to wrap your fingers.
The device
In another way it is called a machine, and is also used to create and remove manicure. For each procedure, a suitable milling cutter is used. It is represented by a nozzle or drill inserted into the equipment.
The cutter gradually removes the coating from the nail while rotating. The procedure can be performed with a nail file, but this can cause destruction and weakening of the plate. The device operates carefully and painlessly.
Fraser
It is represented by a nozzle for the device, and in the salons ceramic products are used, which are characterized by high strength, durability and resistance to wear. During operation, the material does not heat up, and the gel polish is removed from the nails gently and quickly. There is no vibration, and girls do not experience pain.
Sometimes salons use metal cutters made from hard metals. They are equipped with special notches, which have a straight or cross-shaped shape. Reversible or regular metal nozzles are available. As a result of the operation of the equipment, the coating is removed by chips, but does not turn into dust. Therefore, such cutters are used to reduce the thickness of the coating or during correction.
Steamer
Using this equipment, you can remove remaining nail polish in just 10 minutes. The equipment is available in almost every beauty salon. At the same time as the steamer, nail polish remover, a manicure stick and a buff are prepared. The coating removal process is divided into stages:
- the equipment is connected to the network, after which 5 ml of liquid intended for removing shellac is added to it;
- the top is eliminated by a buff;
- Before using the device, the remaining dust is removed;
- hands are placed in the steamer for 10 minutes;
- Remains of gel polish are removed with a stick;
- if a little base remains, then they are removed with a buff in short movements.
At the end of the procedure, the hands are thoroughly washed and the nails are treated with nourishing oil.
At home
The services of manicure salons are considered expensive, so many women prefer to deal with the removal of gel polish on their own. For this, professional equipment or universal tools are used.
If a girl often uses the services of a professional manicurist, it is recommended to purchase equipment for removing nail polish and other coatings in advance.
Remover
The product is sold in beauty salons or specialized cosmetic stores. It has a reasonable price, but it will take about 30 minutes to remove the coating. The process is carried out in the same way as in the salon. To do this, cotton pads are moistened with remover and then fixed on the nails with adhesive tape or tape.
To increase efficiency, girls often wrap their nails with foil.
Impregnated napkins
They are a universal and reusable shellac coating remover. They are often used by women who prefer to do and adjust their manicures themselves. Impregnation does not harm the skin or nails. This prevents cracking or drying out.
Napkins are produced by different companies, but it is important to choose products from reliable companies.
Initially, the package is opened, after which the fingers are lowered into the resulting pocket. The napkin is fixed with the edges of the package, after which the pocket is removed using a scrolling motion. Leave your fingers in this position for about 15 minutes, after which the remaining shellac can be easily removed using a wooden stick. It is advisable to apply moisturizing oil to the cuticle at the end of the procedure.
The device
It has a high cost, so it is advisable to buy it for the home only if the girl constantly uses gel polish. Using the device, the coating is created and removed.
Before work, a suitable cutter is purchased. The procedure is performed from right to left, and the process also begins from the place where the cuticle is located. Movements similar to regular stroking are used. The cutter should be touched carefully, without disturbing the integrity of the nail plate.
Layer-by-layer cutting
This method is considered risky, but is often used by women who do not want to spend money on professional products. You can file off the gel only to the base layer, using careful movements.
Sawing is done with a nail file or buff. But after filing the base coat, you need to stop so as not to damage the nail.
Varnish
Often girls use gel polish remover at home. Initially, regular varnish is applied on top of the coating, after which it is removed with a damp cloth until it dries completely. The procedure must be repeated several times to remove all residues. If even after this there is a little gel left, then it is pryed off with a wooden stick.
This method allows you to quickly remove gel polish, but is not considered very useful.
Vodka
If you don’t have professional products at hand, you can use regular vodka or alcohol. To do this, follow these steps:
- cotton wool is moistened in a small amount of vodka;
- it is applied to the nail, which is then covered with foil;
- fingers are left in this state for 20 minutes;
- After this period of time, the coating becomes soft, so it easily comes off the nail plate.
If necessary, the procedure is repeated.
Acetone-containing products
These also include liquid intended for nail polish remover. The process of removing the coating is quite simple, since it is enough to moisten the cotton wool in the selected liquid, after which it is transferred to the nail for 30 minutes. After this, the coating is removed with a nail file or spatula.
After completing the process, wellness procedures are performed to restore and care for the nails. Therefore, cream or special oils are applied.
Remove gel polish and stay with your nails: step by step with error analysis
Many times I came across video instructions on Instagram for removal at home, where girls subject their nails to executions. I want to look at a few nuances that will make the process more gentle and achieve a better result.
Step 1. Cutting off the top coating.
The most important step on which the success of the enterprise depends. Assess the thickness of your coating by looking at the end of your nails. If you have long nails, chances are your nail polish is thicker, which means more file work. Our goal is not just to “remove the gloss of the coating,” as they like to recommend in tutorials, but to remove the top coating completely, ideally also touching the color. This makes it easier for the liquid to penetrate the base coat and reduces soaking time.
The less gel you remove with a file, the more you will have to sit under the foil, and the worse the coating will get wet.
If your nails are long, it is better to remove the entire length at this stage.
My method: I take a 150/180 file. First, with several wide movements, I remove the main volume with the rough side, then I turn the file 180 degrees with the softer side and continue to cut in the areas of the rollers and cuticles, and remove the volume a little more.
I forgot to take off my nails “before”. We see that there should be no glossy areas left.
My coating is not thick, it will be easier to work.
ready to soak.
Step 2. Soak the coating under the foil.
It’s more convenient to wrap your arms one at a time; first, wrap them completely, wait, and remove one, and do the same manipulations with the other.
On average it takes 10-15 minutes. It is better to wait 15 if there is no burning or discomfort. You can pre-apply oil to the cuticle area and side ridges to level out drying of the skin. This does not affect the quality of soaking; moreover, some more expensive removers for gel polish coatings already contain oil (for example, remover from CND).
I really love this remover from ibd for its smell and effectiveness.
Step 3. Removing the soaked coating.
I'll focus on the instrument. It’s more convenient for me to work with an iron pusher, but a stick will do. In any case, it is important to keep the tool parallel
nail plate. Otherwise, the tool “buries” deep into the coating, and further movements are not scraping, but “tearing” the coating from the nail. As a result, the nail scales are damaged.
If you remove the foil and find that the coating is still not wet enough, return to the file step and remove more. Then we wrap it again and wait. Yes, this means more exposure to acetone on the nails, but this is a much lesser evil compared to mechanical damage.
15 minutes passed, I removed the foil from the first finger. I haven't cleaned anything yet. The gel soaked well and partially came off.
I finished cleaning the first nail with a pusher, let's move on.
result after withdrawal. no torn pieces of nails.
Step 4. Sanding the nail plate.
A soft buff will help with this. If you follow it with a manicure with a remover, it will help remove micro-residues of the base coat that could have been sanded off with a buff after removal.
At the end of the procedure, wash your hands and apply oil and cream to replenish the hydrolipidic balance between the nail scales.
my result after sanding and washing my hands. I didn’t apply oil because... there will be a manicure and a new coating 
At the end, I want to make a lyrical digression about removal in salons (the moment will come when we will start going to salons again, sooner rather than later). Many masters like to elevate acetone to the rank of enemy number 1 for nails, saying that it almost corrodes the skin (now I’m not talking about allergy sufferers). It is not true. In fact, the main reason why masters do not want to remove by soaking is that it takes much more time and body movements. It’s much easier to remove the coating with a cutter, 7-10 minutes and you’re done. As a rule, damage to the nail, if any, is immediately covered with a subsequent coating. And in the end, when the moment of complete removal comes, we find rag nails and then the conclusion: “the gel polish has ruined the nails.” Not gel polish, but a master.
I'm not campaigning, and I'm not saying that all masters are bad, by no means. If you are lucky enough to have a wonderful master, I can only be glad. I mentioned this moment only because I heard a great many similar stories.
That's all for me. If you have any questions, I will be glad to answer in the comments.
I hope my post was helpful and I wish everyone healthy nails!
Increase
Common Mistakes
Even professionals often make serious mistakes during the gel polish removal process. But they usually occur when women remove the coating themselves. These include:
- the use of metal instruments that violate the integrity of the nail plate;
- refusal to apply disinfectants;
- use of liquids that have expired;
- choosing cheap products;
- tearing off gel polish;
- refusal of restorative procedures after removing shellac.
Such actions lead to improper nail growth, damage to the plate, the appearance of fungus or excessive cuticle growth.
Required materials and tools
Before removing gel polish, various devices are prepared:
- ordinary food foil, available to every housewife;
- wooden sticks;
- remover or other product designed to remove varnish;
- file;
- small nail scissors;
- nail oil;
- cotton pads or regular cotton wool.
The foil is cut into small rectangular pieces, and the cotton pads are cut into 4 pieces.
It is not recommended to use cotton wool as it absorbs a lot of liquid.
How much does the service cost?
The cost of the gel polish removal procedure does not depend on the region where the salon is located. To a greater extent it depends on the status of the salon. There are beginning craftsmen who charge a small fee both in Moscow and in the provinces. Likewise, elite establishments with prices above average. That is why the average cost of coating removal is from 150 to 1,200 rubles. You can find places where the service is cheaper or, conversely, more expensive.
Prices in Moscow are slightly higher - there the average bill for removing gel polish is about 300-500 rubles. In the regions you can find places where you will only need to pay 100-200 rubles. The smaller the city or town, the cheaper the procedure will cost. In regional and regional centers you will have to pay more. In each city you can find salons where removing the coating will cost differently.
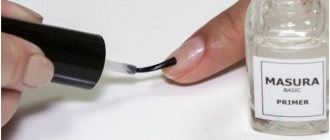
Features of choosing nail polish remover
If you choose the method of removing shellac with nail polish remover, then it is important to choose the product wisely. For this, the following rules are taken into account:
- a liquid is selected that is specifically designed to remove gel polish, and not regular polish;
- It is advisable to buy products produced by the varnish manufacturer;
- The composition must contain strengthening components that allow you to take care of the structure of the nail.
The cost of such a liquid is much higher than acetone-containing products.
How to remove coating from nails
There are only two ways to remove gel polish: grinding and soaking. The coating is a durable polymer that cannot be removed by simple means. If you regularly go for a manicure, you will know exactly how to carry out this procedure correctly. Masters use two methods:
- Physical grinding. Using a file or cutter, the master removes the polymer layer to the base layer. In this case, the surface of the nail plate will not be damaged. The following will help keep it intact: mastering the tool, choosing the right cutter, careful grinding and subsequent processing. Grinding is carried out before subsequent coating, as it creates an ideal surface. Its advantage is that the cuticle does not dry out with this method of removal. You can apply shellac to your nails and continue with a neat manicure.
- Soaking in acetone (or in a special liquid containing it) using foil. This method is not used by professional craftsmen. Its essence is that a cotton pad soaked in solvent is tied to the nail, and then it is wrapped in foil. While the coating is corroded, acetone affects the skin of the hands and the nail plate itself. It dries out the cuticle and damages the nail, so you will need to repair it in different ways.
Modern manicurists and pedicurists prefer to use tools; hardware preparation is almost always carried out before applying shellac. Despite the fact that this procedure seems more traumatic, it does not damage the nail plate.
Step by step guide
To remove gel polish at home, it is recommended to follow the correct sequence of actions. Initial preparation is carried out, which consists of washing hands, softening the cuticle and treating with alcohol.
Sometimes it is advisable to take a bath with essential oils, after which you wipe your hands dry.
Removing coating from your nails
After preparing the nails, collect all the materials and tools that will be needed for the procedure. In order not to be distracted while working, it is advisable to cut cotton pads and foil into small pieces.
Preparation
The preparatory stages consist of treating the nail plate and fingers with nail polish remover gel. To do this, use a quarter of a cotton pad, which is moistened in liquid and placed on each nail.
Attention! The disc is pressed tightly onto the nail plate to treat the entire coating.
Wrap
The fingers are carefully wrapped in foil, which is secured with tape. This procedure is performed for each finger. The foil is left for 15 minutes.
To enhance the effect, it is recommended to lightly massage your fingertips on top of the compress.
Cleansing
After the required period of time, the compress is removed. You can pull the polish off the nail, as after softening it comes off the plate well. The remains are removed with a wooden stick.
If small particles remain, they are removed with a nail file.
Completion
After the process is completed, you have to use nail care measures. Fingers and nails are wiped dry. The nail plate is polished with a nail file, after which moisturizing oil is applied to the cuticle.
It is advisable not to reapply the varnish for several days. Can only be coated with a strengthening agent.
For extended nails
It is allowed to combine extended nails and gel polish, but it is not possible to remove the coating using traditional methods. Acetone causes damage and dissolution of extended nails.
You can remove gel polish from such nails only with a nail file or cutter. To do this, hands are disinfected, and then the unnecessary covering is cut off. The cutter allows you to quickly get the job done, but it requires skill to avoid damaging the nail.
How to remove gel nails at home
Very often there are stories that after removing extended nails, your nails become fragile and brittle, soft, begin to peel and slow down their natural growth. All this is the result of improper removal of gel nails, as well as failure to follow simple rules for caring for your own nail plates.
Tools
In order to get rid of the presence of gel on the nail plate, you will need the following tools: a nail file, tweezers and a special polishing file. In this case, the file should not be metal or glass. We choose an emery file, and its base should be soft.
Goodbye marigolds!
Let's start removing the extended nail. For these purposes we use tweezers. We grab the part of the nail that is to be removed and “bite off” it with a sharp movement. You should remove the nail carefully to avoid pain and discomfort. It must be remembered that the gel is a solid substance and, if handled carelessly and carelessly, can crack, causing damage to the natural nail. Therefore, it is best to bring the extended nail to the required length using a nail file.
Do not tug, pull or try to lift the gel from the nail plate under any circumstances! Such forceful methods can be detrimental to your natural nails, which can crack or even burst from rough and improper manipulation.
So, you got rid of the length of your nail extensions. The next step will be removing, or rather cutting off, the gel itself from the native nail plate. The nail should be filed, covering its tip and side edges. Afterwards, the central part of the nail is filed. The main thing is not to get carried away with the process. In order not to damage the native nail plate, you can not completely remove the gel, but leave a thin layer.
After the process of cutting off the gel from the nail plates can be considered complete, proceed to processing the remaining roughness and irregularities using a polishing file. Movements should be carried out mainly in one direction only. This way, it will be possible to avoid heating the nail plate from friction processes.
After ridding your natural nail plates of extensions, your nails need close attention and careful care more than ever. Lightly heat the oil you have at home, such as olive or sunflower. Apply a thin layer to the nail plate and begin to rub it in with light massaging movements. You can pre-purchase a special manicure oil. Then we polish the nails with a piece of suede or a polisher made of suede specially designed for this purpose. This manipulation is carried out in order to prevent delamination of the nail plate and give a natural shine.
Don't forget to use nourishing nail creams, make compresses and baths. Use strengthening varnishes, which will not only help strengthen the nail structure and activate growth processes, but will also protect the nail plate from external mechanical damage.
It turns out that you can easily remove gel nails at home yourself. If you use these recommendations, then as a result, your natural nails will delight you with a healthy shine, well-groomed appearance and, subsequently, rapid growth!
What to do without foil
Professionals usually use foil, but if you are removing the gel at home, you can replace the foil with cling film. Finger guards are sold in specialized stores, but they are considered expensive and are used only once. Such analogues do not allow air to pass through.
Finger guards are becoming very popular because they do not need to be secured with adhesive tape.
What is required to remove gel polish?
A set of available tools for removing shellac yourself must include a wooden (preferably an orange) stick, a solvent or a special coating remover, disposable sponges (or foil and cotton pads), and a nail file for polishing nails. Also - as an alternative - you may need:
- Cling film. This is an excellent substitute for aluminum foil. It is very convenient to wrap your fingertips with cling film, it is completely sealed and its cost is low (thus, you can remove shellac at home not only without special sponges, but also without foil).
- Plaster and thin plastic bag . Instead of foil or cling film, you can use a regular bag, cut into small pieces, and a plaster that will fix this bag on your fingers.
- Plastic clips . Special clips for removing gel polish can significantly simplify the procedure by securely fixing cotton pads or sponges on your fingers.
Preliminary simplification of the procedure for removing gel polish
To make the process of removing gel polish easier, it is recommended to dry your nails a little before applying it so that there is no oil or grease on them. This will make it easy to remove the coating in the future, although there is a chance that it won't last very long.
Additionally, you can pre-apply an exfoliant. It will remove dust and skin particles that remain after a regular hygienic manicure.
Application of oil
Before applying gel polish, it is important to take care of the nail plate, for which it is advisable to treat it with a special cuticle oil. It can be olive, castor, burdock or almond. It can also be used after removing the coating.
It is advisable to buy pure oils, without adding unnecessary components. The product is rubbed into the ends with gentle and circular movements. This allows you to soften the skin and also remove rough parts. But after this procedure, the fingers are well dried and wiped with a clean towel.
Application of a special base
After treating your nails with oil, it is recommended to strengthen them with a special base. It is produced by many cosmetic companies, and also penetrates deeply into the structure of the nail, positively affecting all layers. After this process, the creation of the gel polish coating begins.
With proper care, there are no negative consequences that arise from wearing the covering for a long time.
Removing gel polish with remover. Step-by-step instruction
To conduct a shellac removal session, prepare the remover itself, cotton pads or cotton wool, food foil and an orange stick or pusher.
- Divide the cotton pad into 4 parts.
- Tear the foil into small squares.
- Use a sanding file to cut off the top coat of gel. Your nails should become matte.
- Wash your hands with soap.
- Apply the cream to the skin around the nail plate.
- Soak ¼ of a cotton pad or cotton wool in the remover and place it on the nail.
- Wrap your finger in foil.
- After 7-15 minutes, remove the foil and cotton wool.
- Using an orange stick or pusher, try to carefully scrape off any loose gel.
- If the shellac cannot be completely removed, reapply the moistened cotton pad and secure the foil.
- You can try to carefully cut off the minimal remnants of the gel with a sanding file.
- Sand the nail plate.
- Treat the cuticles and skin around your nails with cream or oil.
Mistakes when removing gel polish
When removing coatings, mistakes are often made that involve using aggressive liquids or mechanical tools. If the work is done at home, then beginners often do not know how to use saws or milling cutters, so they damage the structure of the plate.
When using professional equipment, it is important to study the instructions, and if chips or cuts appear, you will have to abandon creating the coating.
You cannot tear off the varnish without first softening it.
Restoration of nail plates after removal
After removing shellac, girls often experience that their nails become thinner and weaker, and also become white and unsightly. To restore the plate, simple health procedures are performed. These include:
- It is advisable not to reapply varnish for several days;
- the use of baths designed to strengthen thin nails with the addition of essential oils, sea salt, iodine or other beneficial ingredients;
- To remove the yellowness that appears after removing shellac, lemon oil is ideal.
Regular use of oils helps soften the cuticle, accelerate nail growth, and the nail plate becomes shiny and strong.
Tips for maintaining healthy and beautiful nails
Even with regular application of gel polish, you can keep your nails beautiful and healthy if you use simple recommendations:
- periodically it is necessary to give the nails the opportunity to recover and rest, taking a break for a month;
- Gel polish is applied only to healthy nail plates, so if there are cracks or fungus, you will have to postpone the cosmetic procedure;
- Manicures should only be done by trusted professionals who use reliable equipment and materials;
- Without experience and professional tools, it is not recommended to remove shellac yourself;
- special oils or other means to strengthen and restore are regularly applied to the nails.
Such simple tips allow you to keep your nails strong, shiny and beautiful for a long time.
You can remove gel polish at home or in a salon. To do this, various methods are used, represented by sawing, as well as the use of impregnated napkins, devices with a cutter or remover. It is not allowed to use mechanical force or aggressive chemicals. It is recommended to take breaks and use special oils to restore the plate.